This tutorial shows you how to disable or stop automatic updates to apps installed from Microsoft Store on Windows 11.
Microsoft Store offers a safe and easy way to install apps on Windows 11. One of the biggest advantages of installing apps from the Microsoft Store is that they will be updated automatically as and when an update is available. Keeping our apps up-to-date is essential for ensuring their stability, security, and access to the latest features. However, automatic updates can sometimes be intrusive and can cause damage/delete to app settings, configuration, and other files. In such cases, disabling automatic updates for apps installed from Microsoft Store is the way to go. That way, you can download the updates manually.
Follow the steps given in this tutorial to stop automatic updates to apps installed from Microsoft Store on Windows 11.
Stop Automatic Updates in Microsoft Store
Step 1: Open the Microsoft Store app by searching for it in the Start menu.

Step 2: Click on your user icon on the top bar of the Microsoft Store window and select “Settings“.

Step 3: Turn off the “App updates” option.

With that, apps installed from Microsoft Store will not update automatically.
Disable Automatic Update in Microsoft Store from Registry Editor
You can disable Microsoft Store automatic updates on Windows 11 by changing the AutoDownload registry value. Follow the below steps to learn how.
Step 1: Press the Start key to open the Start menu. Search and open Registry Editor from it.

Step 2: Go to the “HKEY_LOCAL_MACHINE\SOFTWARE\Policies\Microsoft” folder.

Step 3: Right-click on the Microsoft folder and choose New > Key and give the new folder name “WindowsStore“.

Step 4: Right-click on the WindowsStore folder and choose New > Key and give the value name “AutoDownload“.

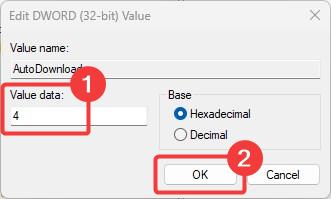
Step 5: Double-click on the AutoDownload value, change its Value Data to 4 and click Ok.
Step 6: Close the Registry Editor and restart your PC.
Disable Automatic Update in Microsoft Store from Group Policy
Windows 11 pro users can enable the Turn off Automatic Download and Install of Updates group policy to stop automatic app updates in Microsoft Store. Follow the steps provided below to learn how.
Step 1: Open the Run window (Win + R), type gpedit.msc, and click Ok to open Group Policy Editor.

Step 2: Go to the Computer Configuration > Administrative Templates folder.

Step 3: Open the Windows Components > Store folder.

Step 4: Double-click on the Turn off Automatic Download and Install of Updates policy to open it.

Step 5: Choose the Enabled option and click Ok.

Step 6: Close all open windows and restart your PC.
That’s it. You can follow any of the above methods to disable Microsoft Store automatic app updates on Windows 11.
I hope this tutorial helped you.
If you are stuck or need help, send an email, and I will try to help as much as possible.
Related Microsoft Store tutorials:
- Fix for Microsoft Store stuck downloading apps
- Find the Microsoft Store apps location on your PC
- How to reinstall Microsoft Store
- How to delete the Microsoft Store cache
- How to uninstall apps downloaded from Microsoft Store
- How to uninstall built-in store apps on Windows
- How to disable Microsoft Store on Windows
- How to stop/kill an app downloaded from Microsoft Store
- Fix Microsoft Store error 0x80244018
- Best free games on Microsoft Store
- Best shooter games on Microsoft Store
