When your C drive is full or nearly full, it appears in red in File Explorer and Windows shows the “your computer is running low on storage” notification. The good thing is that you have several options to free up space on the C drive on Windows 11 and make room for other important files and programs.

This tutorial shows you some of the best ways to clear C drive space and make sure you never get the ‘low storage’ notification on Windows 11. Let’s get started.
1. Delete temporary files
When your C drive is low on disk space, the first thing you should do is delete all the temporary files such as temp files, delivery optimization files, thumbnail cache, previous Windows installation files, temporary internet files, and Windows error reports & diagnostic files. Depending on your computer, deleting temporary files can recover several gigabytes worth of C drive space. Here’s how to do it.
First, open the Windows 11 Settings app by pressing the “Windows key + I” key combination on your keyboard. You can also search for “Settings” in the Start menu.
Go to the System > Storage page in the Settings app and click on the Temporary Files option.

Now, select all the checkboxes on this page and press the Remove Files button at the top.

This will delete all the temporary files from Windows 11 and frees up C drive space.
2. Clear recycle bin
Every time you delete a file, it is moved to the recycle bin. If you change your mind, you can easily restore any deleted file or folder from the recycle bin. However, the side effect of this is that files in the recycle bin consume disk space just like any other file on your computer. So, when you don’t have enough storage space in your C drive, clearing the recycle bin will free up the space. This is especially helpful if you recently deleted a large number of files (or a few big files).
To delete all the files in the recycle bin and clear it, go to the desktop (Win + D), right-click on the recycle bin icon, and choose the Empty Recycle Bin option.

Alternatively, double-click on the recycle bin icon on the desktop to open it, select all the files in it with the “Ctrl + A” keyboard shortcut and press the Delete key on your keyboard.
Whichever method you use, the recycle bin is cleared and a few gigabytes worth of storage space is cleared in the C drive (depending on your computer).
3. Clear browser cache
Clearing the browser cache is another easy way to reclaim C drive space. Most don’t consider this but almost all modern browsers such as Edge, Chrome, and Firefox store cached data to speed up browsing. Depending on how long you’ve been using the browser, the cache data size can be huge. For example, my Chrome browser uses around 6 GB of disk space in the C drive as the browser cache. Here’s how to clear the browser cache.
On Chrome:
- Open the Chrome browser.
- Click on the Menu icon.
- Choose the Settings option.
- Click on Privacy and Security on the sidebar.
- Click on the Clear browsing data setting.
- select All Time from the top dropdown menu.
- Select the “Cached images and files” checkbox.
- Press the Clear Data button.

On Edge:
- Open the Edge browser.
- Click on the Menu icon at the top right corner.
- Choose the Settings option.
- Go to the Privacy, Search, and Services tab on the sidebar.
- Click on Choose what to clear button under the Clear browsing data section.
- Select All Time from the Time Range dropdown menu.
- Select the “Cached images and files” checkbox.
- Press the Clear Now button.

On Firefox:
- Launch the Firefox browser.
- Press the Menu icon on the address bar.
- Click on the Settings option.
- Go to the Privacy & Security tab.
- Click on the Clear Data button under the Cookies and Site Data section.
- Select the Cached Web Content checkbox.
- Press the Clear button.

Note: If you are some other browser apart from the ones listed above, such as Brave or Opera, the process of clearing cached data is very similar.
4. Move the downloads folder
By default, the Downloads folder is located in the C drive and anything you download is automatically saved to it. Over time, the downloads folder can grow huge and occupy a lot of disk space in the C drive. This is especially true if you don’t monitor your downloads folder and delete unnecessary files.
To free up the C drive space and avoid a low disk space error in the future, you should move the downloads folder to another drive. I’ve already written a detailed tutorial on it. Click on the link and follow the steps.
5. Move personal files to another drive
If you have a lot of personal files on the desktop or in folders such as Documents, Pictures, Videos, etc., in the C drive, moving them to another drive can help free up some space on the C drive. More often than not, you overlook these files and they take up a lot of disk space on the C drive.
For example, people often drag and drop files/folders from external drives on the desktop for convenience and forget about them. Over time, these kinds of files can grow in number and/or size and occupy a lot of space on the C drive.
In general, it is always recommended that you never save your personal files to the C drive. Always use another drive or partition. That way, these files don’t occupy precious C drive space and you won’t lose access to them in case of system reinstallation and or unfortunate incidents like OS corruption.
6. Use the files-on-demand feature in OneDrive
If you are a OneDrive user, enable the Files-on-Demand feature. Once enabled, you can set all or specific files or folders to be available online only. That way, you can still see them in the File Explorer but won’t occupy the C drive space.
For example, I have a photos folder in OneDrive that occupies a lot of C drive space. Making it online-only instantly frees up that much space in the C drive. When you need access to a file in the online-only folder, double-click on it, and OneDrive will instantly download it from the cloud storage.
- Right-click on the OneDrive icon on the taskbar.
- Click on the Gear icon and choose Settings.
- Select the Sync & Backup tab on the sidebar.
- Click on the Advanced Settings link at the bottom.
- Scroll down and click on the Free Up Disk Space button.

As soon as you click the button, OneDrive marks all the files as online only and frees up the space occupied by them in the C drive. When you want to access a file, double-click on it, and OneDrive will automatically download and open it.
Set a specific file or folder as online-only in OneDrive:
To set a specific file or folder as online-only, open the OneDrive folder in File Explorer, right-click on the file or folder, and choose the “Free Up Space” option.

7. Delete system restore points
On Windows, system restore points are helpful in that when something goes terribly wrong, you can restore your computer to a known good state. When system restore functionality is enabled, Windows and other applications can create automatic restore points on occasions such as updating Windows, installing or uninstalling programs and drives, changing important system settings, etc. Additionally, you can also manually create restore points as needed.
While system restore functionality is useful, each restore point occupies a considerable amount of space in your C drive. As such, when you are low on C drive space, it is better to delete system restore points and reclaim the space. Here’s how to do it:
First, open the Settings app (press Windows key + I) on Windows 11. Go to the System > Storage page and click on the “Show more categories” setting.

Click on the System & Reserved option at the top.

Scroll down and press the Manage System Restore button.

Select your C drive and click the Configure button.

Press the Delete button at the bottom and click Continue when prompted to delete all system restore points.


8. Remove unused user accounts
All user accounts on Windows are stored in the C drive. If your system has multiple accounts, each user account consumes some amount of disk space in the C drive. This is especially true if a specific user account has a lot of files. As such, if you no longer need a user account, it is better to remove it from Windows and reclaim the disk space occupied by it in the C drive.
Note: Before deleting a user account, backup all of its data to be safe.
To remove a user account in Windows 11, open the Settings app, go to the Accounts tab, and click on the Other Users setting.

Next, click on the user account you want to remove and press the Remove button.
When prompted, press the Delete Account and Data button.
9. Uninstall unnecessary programs
As you use Windows, it is natural that you install a lot of programs. The side effect of this is that each program you install consumes the C drive space. So, if you no longer need a specific program, uninstalling it from Windows will clear C drive space.
Launch the Settings app, go to the Apps tab, and click on the Installed Apps option.

Find the application you want to uninstall, click on the More Options (…) icon, and choose the Uninstall option. Follow the on-screen wizard to uninstall the program.

If you have more than one application to uninstall, follow the same steps and install all the unnecessary applications. You can also use uninstaller software such as Bulk Crap Uninstaller to bulk uninstall applications and remove leftover files. Once done, reboot your computer.
10. Turn off hibernation
Even though you no longer see the Hibernation option, it is still enabled in the background and uses up a lot of C drive space. On my computer, the hibernation file size is 6.35 GB. That means, around 6+ GB of C drive space is occupied by the hibernation feature. When low on disk space, disabling hibernation will reclaim wasted space.
Check hibernation file size:
To check the hibernation file size go to > System > Storage > Show more categories > System & Reserved and take a look at the “Hibernation File” section.
Turn off hibernation to clear C drive space:
To disable or turn off hibernation, press the Windows key + X shortcut and select the Terminal (Admin) option. Type powercfg /hibernate off in the terminal window and press Enter.
The above action will disable hibernation and deletes the hibernation file freeing up the C drive space.
11. Enable NTFS Compression on specific folders
Windows has a nifty feature called NTFS compression that lets you compress data in a folder without altering how you access it. i.e., you can still open and use the compressed folder just like any other folder on your computer. If you have a specific folder in the C drive that you cannot move to another drive or delete data from it, the next best thing you can do is compress it using the NTFS compression feature. At the cost of performance and speed when accessing the compressed folder, you get to free up space on the C drive. Here’s how to do it.
First, open the File Explorer and locate the folder you want to compress in the C drive. Next, right-click on the folder and choose the Properties option.

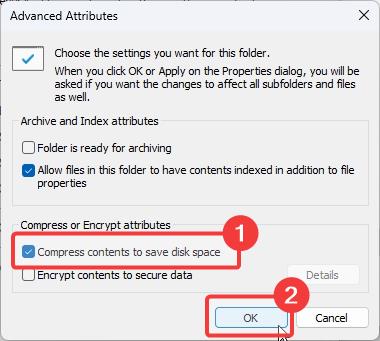
Under the General tab, press the Advanced button. Select the “Compress contents to save disk space” checkbox and press the Ok button.

Choose the “Apply changes to this folder, subfolders, and files” checkbox and press the Ok button.
Wait for the changes to apply to all files and subfolders and press the Ok button.
This action will prompt Windows to compress the data in the selected folder. Depending on the folder size and number of files in it, the NTFS compression will take time. In the meantime, you can use your computer normally and Windows will do the job in the background.
Important note: Never compress system folders such as Windows, System32, Users, etc. It will negatively impact the overall system performance.
12. Exclude unnecessary folders from the Search Index
If you have enabled Enhanced Search in Windows 11, it will scan your entire computer and indexes all the content so that the search works faster. While useful, depending on the number of files your system has, the search index cache size can be huge. Since the indexed cache files are stored in the C drive, that’s a lot of wasted space when you are low on storage.
To rectify that, you can either exclude unnecessary folders from the search index or disable enhanced search entirely. Whichever method you follow, it will reduce the search index size and free up space on the C drive on Windows 11. Here’s how to do it.
Exclude folders from enhanced search:
- Open Settings.
- Go to the Privacy & Security > Searching Windows page.
- Click on the Add an Excluded Folder button.
- Select the drive or folder to exclude and press Choose Folder.

Disable enhanced search:
- Open Settings.
- Go to the Privacy & Security > Searching Windows page.
- Choose the Classic option under the ‘Find my files’ section.
The classic search mode only indexes and searches your documents, downloads, pictures, music, and desktop.

13. Enable the Compact OS feature
The Compact OS feature in Windows lets you reduce the overall footprint of the OS and its installed applications. While this feature is mainly designed for low-storage systems, it can help you reclaim some storage space in your C drive at the expense of performance. If you are in dire need of extra space in your C drive, enable the Compact OS feature.
First of all, open Windows Terminal as an admin. You can do that by choosing the Terminal (Admin) option in the Win + X menu. In the Terminal window, type compact.exe /compactOS:always and press the Enter key on your keyboard to run the command.
This command will force Windows to compress its files and binaries to occupy as little space as possible. Once the compression is done, you will get back a couple of gigabytes worth of C drive space. As I said earlier, it will degrade your system performance. So, only use this when you don’t have any other option.
In the future, run the compact.exe /compactOS:never to disable Compact OS.
14. Extend the C drive partition
If you have extra space in other drives, you can shrink them and use that resulting space to extend the C drive partition. This increases the total available space in the C drive.
You can either use built-in tools like Diskpart to extend partitions or third-party software such as Paragon Partition Manager or MiniTool Partition Wizard. I recommend you use one of the third-party tools mentioned here since they have a pretty beginner-friendly UI and makes the entire process easier.
That being said, if you choose to extend the C drive partition, be very careful. Any mistake or power loss during the process can cause data loss. So, ensure you backed up your system fully before proceeding.
14. Run virus scan
If your C drive is constantly filling up even after following all the above suggestions, it might be that your system is infected with malware or virus. I recommend you perform a full system scan and offline scan with Windows Defender. Additionally, install the Malwarebytes Anti-malware application and perform a full system scan again. If the antivirus software finds any threat, follow the cleanup recommendations suggested by it. This should fix the C drive low storage problem due to virus or malware infections.
15. Enable storage sense
Finally, to ensure that you never face low disk space error in the C drive, you can use the built-in Storage Sense feature in Windows 11 to automatically clear temporary system & app files and recycle bin. Here’s how to configure it.
First, launch the Windows 11 Settings app. Go to the System > Storage page and click on the Storage Sense option under the Storage Management section.

On this page, configure the following:
- Select the “Keep Windows running smoothly by automatically cleaning up temporary system and app files” checkbox.
- Turn on the “Automatic user content cleanup” option.
- Select “Every month” from the “Run storage sense” dropdown.
- Select “30 days (default)” from the “Delete file in recycle bin if they have been there for:” dropdown.
- Select “30 days (default)” from the “Content will become online-only if not opened for more than:” dropdown.
That is it. From now on, Storage Sense will automatically run once every 30 days to remove temporary files and clear the recycle bin to free up space in the C drive.

Wrapping Up
As you can see, Windows 11 provides several ways to clear unnecessary files and reclaim space in your C drive. Follow all the methods shown above and you will free up a significant amount of storage space in the C drive. I really hope this small guide helped you when you face a low storage space situation on your computer.
If you are stuck or need help, send an email or comment below, and I will try to help as much as possible.
