With a simple keyboard shortcut, you can make any window transparent and see-through. Here are the exact steps to make a window transparent in Windows 10.
If you have multiple windows stacked on top of each other, making one or more windows transparent makes life a lot easier to manage and see what’s behind the active window. This virtually eliminates the need to switch between windows. You can snap windows to all four corners of the desktop. However, there might be situations where you need to place windows on top of the other while having to see both the windows at the same time. For instance, if you are a graphic or web designer, seeing the changes instantly while you are designing or coding is helpful.
Thankfully, even though Windows doesn’t offer any official option, making a window transparent is easy in Windows 10. To get you started, here is a simple guide to making any window transparent in Windows 10.
Jump to:
AutoHotKey Script to Make a Window Transparent
The easiest way to make a window transparent is to use the AutoHotKey. It is easy and you can assign a keyboard shortcut for a transparent window. Here are the exact steps you should follow.
- First, get AutoHotKey and install it.
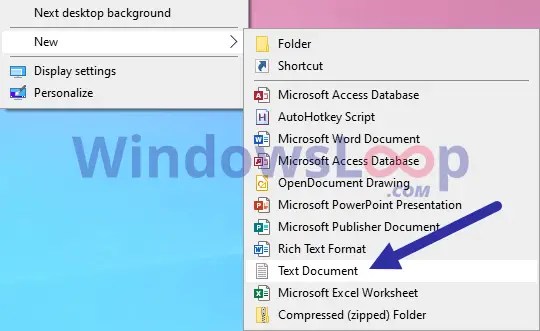
- After installing, right-click on the desktop and select “New → Text Document“.
- Set the name as “TrasparentWindow.ahk“. Though you can name the file anything you want, make sure you replace .txt with .ahk.
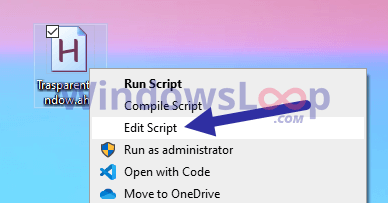
- Right-click on .ahk file and select “Edit script“.
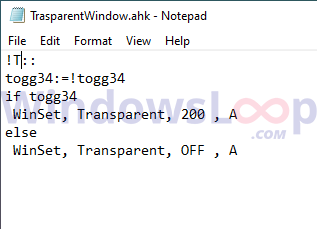
- The file will be opened in the Notepad. Copy and paste the below code in it.
;Press Alt + T
!T::
togg34:=!togg34
if togg34
 WinSet, Transparent, 200 , A
else
 WinSet, Transparent, OFF , A
- Select “File → Save” or press “Ctrl + S” to save the file.
- Close the Notepad.
That is all. Double-click on the newly created file to run it. As long as the script is running, you can make any window transparent. Just select the window and press the “Alt + T” keyboard shortcut. Press the shortcut again to make the window normal.
PeekThrough App for Transparent Window in Windows 10
PeekThrough lets you change the opacity of any window with a keyboard shortcut. The application even lets you set how transparent a window can be.
- First, get the PeekThrough application from here and install it.
- After installing, open the Start menu.
- Type “Peek Through” and click on the result to open the app.
- After opening the app, click on the “Activate” button.
- (Optional) To change the transparency value, go to the “Transparency” tab and move the slider as needed.
- Click the “Save” button to apply the settings.
- Minimize the application.
As soon as you click the minimize button, the application will be minimized to the taskbar. From now on, whenever you want a transparent window, select it and press the “Win + A” keyboard shortcut. Press the shortcut again to make the window normal.
That is all. I hope that helps. If you are stuck or need some help, comment below and I will try to help as much as possible. If you like this article, check out how to make the taskbar transparent.


Is there no way to do it without having to download random software from the internet?
As of now, you have to use an external software to make window transparent.
Thank you for sharing. I have been using AHK for over a year now. For some unknown reason, my windows went transparent when I would resize them. This helped them not be transparent. So helpful.
Windows doesnt change the txt to the new ahk filetype.
PeekThrough says there are conflicting hotkeys and doesn’t run.
If you change the extension from .txt to .ahk, it will automatically turn it into AutoHotKey file type. To properly change the extension, make sure the “file name extensions” option is enabled.
As for the PeekThough, use a different hotkey if the hotkey you want to use is already bound to another program.
Win+A is already bound by the OS what a bad choice. Win+A is action center.
Thank you so much… God Bless you