Identifying which process or application is using a specific file is very useful on Windows, especially for troubleshooting purposes such as file lock errors, application crashes, or unexpected behavior such as being unable to save a file. In this tutorial, we’ll show you four easy methods to quickly identify which process is using a file on Windows.
Note: The below steps are tested to work on Windows 10 & 11.
Methods to See Which Process is Using a File on Windows
Here are four methods you can follow to identify the process or program using a file. In most cases, the first method, which shows how to use the built-in Resource Monitor application to identify the process using a file is all you need. However, if that didn’t work or you are looking for alternative methods, follow the other three methods.
1. Using the Resource Monitor
Resource Monitor is a built-in application that gives detailed information about your system resources such as CPU, memory, network, services, running processes, and processes that are using specific files.
1. Press the Windows key + R shortcut to open the Run dialog window.
2. Enter resmon in the blank field and click OK to open the Resource Monitor.
3. Navigate to the CPU tab in the Resource Monitor window.
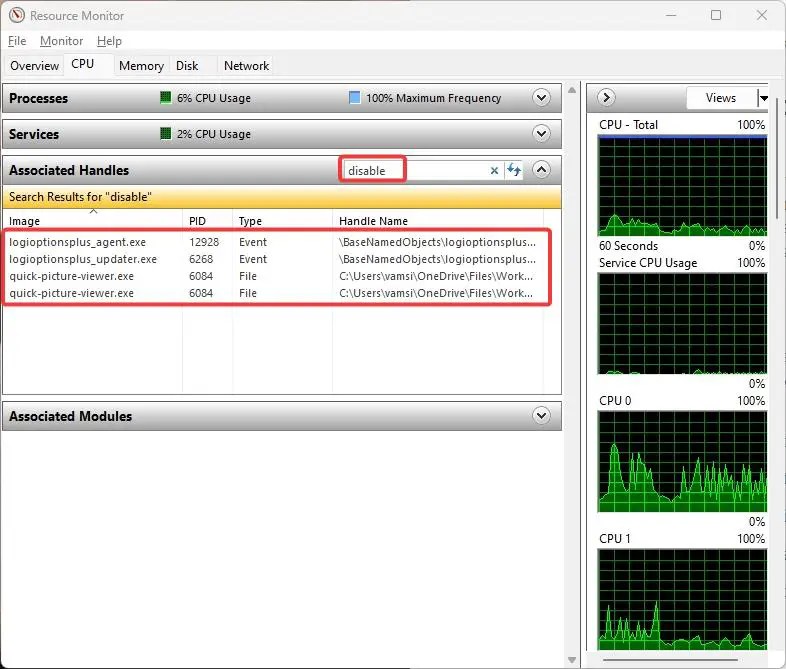
4. Under the CPU tab, click on the Associated Handles tab to expand it.

5. Type full or part of the file name in the Search Handles field.
6. Recourse Monitor will show all the processes using the file.
7. To stop a process from using the file, simply right-click on the process and select End Process.

8. Click End Process in the confirmation window.

2. PowerShell Command
If you wish to use PowerShell, keep in mind that it is pretty limited by itself. As such, we are going to use a free application from Microsoft called Handle. It’s a command line tool that gives you all the information regarding which program has a particular file or directory open.
1. First, download Handle.
2. Right-click on it and select Extract All.

3. Click the Extract button to extract the zip to the same folder.

4. Right-click on the Windows logo on the taskbar and select the Terminal (Admin) option. Alternatively, you can also search for Windows PowerShell in the Start menu, select it, and click on Run as Administrator.

5. In the PowerShell tab/window, run the cd command below to navigate to the extract folder.
cd "C:\path\to\extracted\folder"

6. Run handle.exe with the full name of your file (along with its extension) as an argument. For example:
.\handle.exe -a "YourFullFileNameHere"
7. Click Agree.

8. The PowerShell window will scan and show all the processes and programs using that particular file.

3. Using File Locksmith in PowerToys
PowerToys is a free application from Microsoft that adds several powerful tools and functions to Windows. One such tool is File Locksmith. Using this PowerToys tool, you can find the program using a particular file. Here’s how.
1. Download and install PowerToys.
2. Open the Start menu, search for PowerToys, and click on the top result to open PowerToys.
3. Turn on the File Locksmith module.
4. Open File Explorer, find the file, right-click on it, and select Show More Options.

5. Select the Unlock with File Locksmith option.

6. You will see the process that’s using the file in the File Locksmith window. If you want, click on the End Task button to close the process and unlock the file.

4. Using Process Explorer
Process Explorer is another powerful utility from Microsoft that can show the applications using a file.
1. Download Process Explorer from the Microsoft website.
2. Right-click on the downloaded zip, select Extract All, and then click on Extract to extract the zip file to the same folder.

3. Open the extracted folder, right-click on the procexp.exe file, and select Run as Administrator.

4. Click Agree.

5. In the Process Explorer window, select Find > Find Handle or DLL (you can also press Ctrl + Shift + F).

6. Type the file name and click Search.
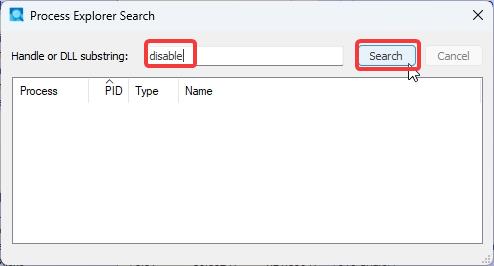
7. Process Explorer shows all the processes using that particular file. Select the process and it will be highlighted in the main window.

8. If you want, right-click on the process and select Kill Process to end the process and unlock the file.

And there you have it! These are the four methods you can use to see which program or process is using a specific file. If you have any questions, comment below and we’ll answer.