Want to try Ubuntu in Windows 10 itself? Here is how to install Ubuntu in Windows 10 using VirtualBox in concise and straightforward steps.
Other than Windows, there are many different operating systems out there. Ubuntu is one such popular Linux-based operating system that many uses like to experience at least once. Unlike regular programs, full-fledged operating systems require a particular installation procedure where you need to replace the existing OS or install it in dual boot mode. In dual boot mode, you can choose the OS you would like to boot with. If you are looking for long-term or know what you are doing, installing it in dual boot mode is the way to go. That way, you can enjoy both Windows and Linux.
However, what if you want to try a new operating system like Ubuntu or only use it occasionally? In those cases, you can install Ubuntu directly in Windows 10 as a virtual machine using a special virtualization software called VirtualBox. If you don’t know, VirtualBox is a widely used free software to virtualize operating systems in Windows OS itself. i.e., it runs just like any other Windows program.
This quick and straightforward Windows guide will show you how to install Ubuntu in Windows 10 using VirtualBox software. It is easy to do. Here is how.
Prerequisites
Before proceeding with the actual installing process, you have to do two things. First, download VirtualBox and install it like any Windows software. Second, download the latest Ubuntu ISO. Once you’ve done these two things, follow the guide below.
Install Ubuntu in Windows 10 using VirtualBox
First, open the VirtualBox program by double-clicking on the desktop icon. You can also search and open it from the Start menu. After opening VirtualBox, select the “Machine > New” option. This action will start a new VM creation wizard.

In the “Name and Operating System” screen, type a name for the virtual machine in the “Name” folder, select “Linux” in the “Type” dropdown menu, and “Ubuntu (64-bit)” from the “Version” dropdown menu. Click “Next.”

Now you need to allocate memory to the virtual machine. I recommend you give at least 2GB RAM. Use the slider or type “2048” in the available field to allocate 2GB RAM. You can assign more if you want to. Click “Next.”

Choose the “Create a virtual hard disk now” option and hit the “Next” button.

Choose the “VDI (VirtualBox Disk Image)” option and press “Next.”

Select the “Dynamically Allocated” option and click “Next.” This option makes it so that the hard disk space is allocated on a “need to use” basis. i.e., the entire space will not be allocated at once.

Now, select how much hard disk space you want to allocate. I recommend at least 20GB to have enough space to install applications and files in the Ubuntu VM. Click the “Create” button.

As soon as you do that, the virtual disk is created. Ensure the virtual machine is selected on the sidebar and click the “Settings” option on the main screen.

Select “Storage” on the sidebar of the Settings window. On the right panel, select the CD icon under the Storage Devices section.

Next, click the CD icon next to the “Optical Drive” dropdown menu and select the “Choose a disk file” option.

Select the Ubuntu ISO and click the “Open” button.

Click “Ok” in the VM Settings window.

You will see the newly added disk image file in the “Storage” section of the main window. Click the “Start” button appearing at the top.

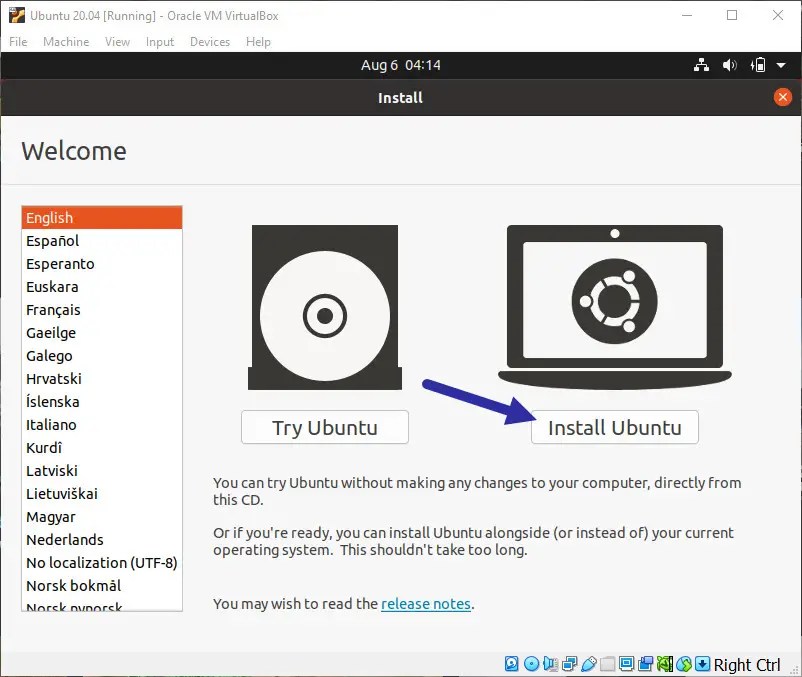
The above action will turn on the virtual machine and boot into the Ubuntu installation media. After booting, click the “Install Ubuntu” option.

Select your keyboard layout and click “Continue.” If you don’t know the keyboard layout, click the “Detect keyboard layout” button and follow the wizard.

Select the “Normal installation” option under the “What apps would you like to install to start with?” section. Optionally, you can also select the “Download updates while installing Ubuntu” and “Install third-party software for graphics and Wi-Fi hardware and additional media formats” checkboxes. Click “Continue.”

Choose the “Erase disk and install Ubuntu” option and press “Continue.”

Ubuntu will now show an information window detailing what changes are being made to the virtual hard disk. Click “Continue.”

Select your country and hit “Continue.”

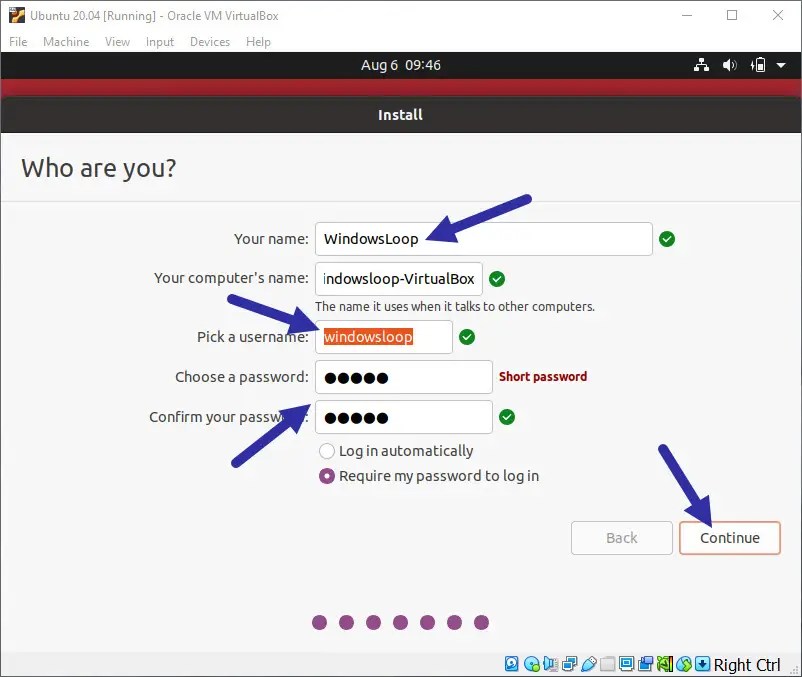
Type a name, username, password in the appropriate fields and click “Continue.” If you don’t want to type the password every time you launch the VM, select the “Log in automatically” option.

The Ubuntu setup is all done, and it starts the actual installation and configuration process. It will take some time to complete. So, sit back and wait.

Once the installation is done, you will see a restart prompt. Click the “Restart Now” button.

On the boot screen, Ubuntu might prompt you to remove the installation disk and press Enter. Generally, VirtualBox automatically removes the installation disk once the installation is done. So, simply press Enter to boot into Ubuntu. If the installation disk is not removed, click the “CD” icon in the bottom bar and select the “Eject” option.

On the lock screen, select your user account and type the password to log into Ubuntu.

That is it. With that, you have successfully installed Ubuntu in Windows using VirtualBox. You can now start using it.

To make the experience as smooth as possible, I recommend you install VirtualBox guest additions in Ubuntu. It will give you better performance and lets you resize the VM screen.
I hope that helps.
If you need any help, comment below, and I will try to help as much as possible.
