Want to find the currently installed Java version number? Follow the steps in this article to check the Java version in Windows 10 and 11.
Although it is rare, there may be situations when installed programs require a specific Java version. This is especially true when coding, developing, or testing for a particular Java version.
If you ever need it, Windows has two ways to check the Java version installed on your PC.
So, without further ado, let me show you how to check the Java version in Windows 10 and 11 operating systems.
Table of contents:
- Check the Java version using Terminal
- Use ‘About Java’ to find the Java version
- Update Java to a newer version
The steps below work the same in Windows 10 and 11.
Check the Java version using Terminal
Key takeaway: Open Windows Terminal and run the java -version command. It will immediately show the currently installed Java version in Windows.
- Right-click the Start menu.
- Choose the “Terminal” option.
- Run “java -version” in the command line.
- The Java version is displayed in the terminal window.
- Close the terminal window.
- With that, you now know the installed Java version.
Steps with more details:
First, launch the Terminal application in Windows 11. To do that, search “Terminal” in the Start menu or right-click the Start icon on the taskbar and select “Terminal.” Windows 10 users can open PowerShell or Command Prompt from the Start menu if the Terminal is unavailable.
In the terminal window, run the java -version command. The terminal window will show the currently installed Java version as soon as you do that. In my case, it is version 1.8.0_351. If you have installed multiple versions, the command output will list all those versions.

If needed, you can select the version number with your mouse pointer and press “Ctrl + C” or right-click inside the command window to copy it to the clipboard.
Once everything is done, close the terminal window.
Use ‘About Java’ to find the Java version
Key takeaway: Search and open “About Java” in the Start menu. It shows the Java version.
Another easy way to check the Java version is to use “About Java.” Here’s how.
- Press the “Start” key.
- Search and open “About Java.”
- This window shows the Java version and build number in the first line.
- Close the window.
- With that, you now know the currently installed Java version.
Steps with more details:
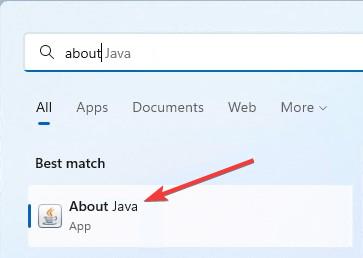
First, press the Start key on your keyboard or click the Start icon on the taskbar. This action opens the Start menu. Next, search and open the “About Java” application.
When you open it, the first line will show the currently installed Java version and build number.

If you are wondering, unlike the command line method, it will not show all the versions if you have multiple Java versions installed. It just shows the most recent version.
Update Java to a newer version
When necessary, you can upgrade or update Java to a newer version with just a few clicks. This is especially helpful if you find yourself using outdated Java. Here’s how.
- Open the Start menu.
- Search for “Java.”
- Click the “Check for updates” from the results.
- Press the “Update Now” button.
- Java will update to a new version if it is available.
- Once done, you can close the Java Control Panel.
- A restart may be required to complete the update process.
- With that, you’ve successfully updated Java.


—
That is all. It is that simple to find the Java version in Windows 10 and 11.
I hope this simple and easy Windows how-to guide helped you.
If you are stuck or need help, send an email, and I will try to help as much as possible.