If your external hard disk is in NTFS or exFAT format, you can easily convert it or format it in FAT32. Here are the exact steps to follow.
Hard disks have grown in disk space dramatically. I mean, you can find external HDDs well over 1TB for a relatively cheap price. This makes them very attractive for a wide range of things like on-the-go media storage devices, offline storage, etc. In general, most of these external hard drives, especially the ones over 500GB are formatted in NTFS or exFAT formats. These file system formats are fine and work well with almost any computer or laptop. However, the problem is that most TVs and mobile devices don’t support these new file system formats.
So, if you want to connect the external hard disk to a TV or mobile device, you first need to convert the file system format of the external hard disk from NTFS to FAT32. Since the FAT32 file system is an older format and supported by virtually every device, you don’t have to worry about compatibility issues.
Without further ado, let me share with the steps to format an external hard disk in FAT32 format.
Jump to:
- How to Format External Hard Disk in FAT32 from Command Prompt
- How to Quick Format External Hard Disk in FAT32 using FAT32 Format
Important Note: Before proceeding with the steps below, backup all the data in the disk. The format procedure will delete all data in the external drive.
How to Format External Hard Disk in FAT32 from Command Prompt
- First, plug in the external hard drive.
- Open the File Explorer and note down the drive letter and the drive name.
- After that, Open the Start menu by pressing the “Windows Key”.
- Type “Command Prompt“, right-click on the result and select “Run as administrator“.
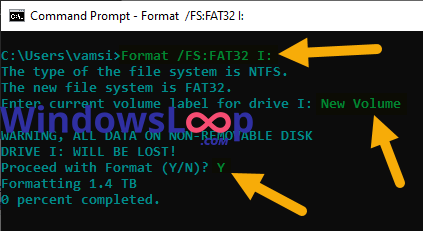
- After opening the command prompt as admin, execute the below command. Replace “Drive_Letter” with the actual drive letter.
Format /FS:FAT32 Drive_Letter: - If you are prompted for the volume name, type the name you see for the external hard drive in the File Explorer. Press the Enter button to execute.
- When asked for confirmation, type “Y” and press Enter.

- As soon as you press the button, Windows will start the formatting process.
Depending on the hard disk size, it is can take some time to complete the FAT32 formatting process. So, sit back and wait for it to complete. Once completed, you will see the “Format complete” message. If need, you can verify the file system in Windows.
How to Quick Format External Hard Disk in FAT32 using FAT32 Format
You can use a free software called FAT32 Format to quick format an external hard drive in FAT32 format. Here are the steps you should follow.
- Get FAT32 format from here (go to the bottom of the page to find the download link).
- After downloading, double-click on the exe file to open the application.
- Now, select the drive from the first drop-down menu.
- Select the “Quick Format” option.
- Finally, click on the “Start” button.


As soon as you click the button, the software will format the disk in FAT32 format. Since this is a quick format, it will not that that much time compared to the Command Prompt. Once that is done, you can safely close the program.
—
As you can see, though not as straightforward as you’d like to be, it is pretty easy. If you want to, you can also partition the external hard disk.
Why Can’t I Format External Hard Disk in FAT32 from File Explorer
In case you are wondering, Microsoft stopped providing the FAT32 format option for drives bigger than 32GB. Mainly because the FAT32 file system is pretty old and has serious limitations compared to the newer file systems like NTFS or exFAT. For example, you cannot store files bigger than 4GB in a FAT32 disk drive. Moreover, the file system only supports drives up to 8GB.
I hope that helps. If you are stuck or need some help, comment below and I will try to help as much as possible.