With the Ultimate Performance Mode, you can improve the system’s overall performance. Here’s how to enable Ultimate Performance Mode.
The new Windows 10 April 2018 update has a lot of new features. Some of them include but are not limited to Timeline, improvements to Edge, user interface improvements, ability to add security questions to local accounts, HEIF image support, etc. One of the new hidden features included in the April 2018 update is the ability to enable Ultimate Performance mode.
Let me show you how to enable the Ultimate Performance Mode in Windows 10 with just a few clicks.
Jump to:
- What is Ultimate Performace Mode
- Check Windows version (you should be using v1803 or up)
- Enable Ultimate Performance mode
What is Ultimate Performace Mode
The Ultimate Performance mode is a new Power Option specifically designed for PCs with mid to high-end GPUs. This mode allows you to get a bit more performance out of your Windows 10 machine when enabled. This performance improvement may not be significant, but you might see a few extra FPS (frames per second) in games. Keep in mind that enabling Ultimate Performance Mode might increase the overall power consumption and heat output.
Due to the power consumption and heat output concerns, the Ultimate Performance mode might not be available for laptop users.
Check Your Windows Version
To use this new feature, you should be running Windows 10 April 2018 update (v1803) or higher.
You can check your current Windows version from the “About Windows” page.
Press Win + R, type “winver” and press enter. You will see the Windows version in the second line. The version should be 1803 or up. Don’t mind the build number; it will change every time you receive a regular Windows update.
Once you are sure you are using Windows 10 with April 2018 update or higher, follow the steps given below to enable Ultimate Performance Mode.
Enable Ultimate Performance Mode
Enabling Ultimate Performace Mode is not that hard. However, when you go to the Power Options window in Windows 10, you will not see the Ultimate Performance option. All you see is the regular High-Performance option. The Ultimate Performance option is hidden by default. To see the Ulitmate Performance option, you have to execute a simple PowerShell command.
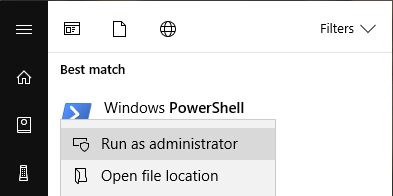
1. To open PowerShell, search for PowerShell in the start menu, right-click on it and select “Run as Administrator.”
2. After opening the PowerShell window, Paste the below command and press Enter. You will receive (Ultimate Performace) as the output.
powercfg -duplicatescheme e9a42b02-d5df-448d-aa00-03f14749eb61
3. Now, search for “Control Panel” in the start menu and open it.
4. Here, make sure that the “View by” is set to “Large icons” in the upper right corner, scroll down, and then click on the option “Power Options.”
Alternatively, open the Settings app and go to “System -> Power and Sleep.” Click on the “Additional power settings” under “Related Settings” appearing in the right panel.
5. In this window, expand the “Show additional plans” button, select the “Ultimate performance” option, and you are good to go.
It is that simple to enable Ultimate Performance mode on Windows 10.
As I said before, this feature is mainly intended for high-end PCs. Even then, you won’t see any significant increase in performance. But, when needed, the Ultimate Performance mode can help you ring out that extra bit of juice from your system.
I hope that helps. Comment below talking about the new ultimate performance mode on Windows 10 or if you face any problems while enabling it.


what wold the powershell command be to select ultimate performance, if it is already an option under the hide additional plans tab. so a command to put into powershell that changes the power plan from Balanced to Ultimate performance.
When it comes to setting power plans, PowerShell has no simple commands, at least to my knowledge. If you are still interested, take a look at this Microsoft Devsblog entry that goes into great detail on setting a power plan via PowerShell.
https://devblogs.microsoft.com/scripting/use-powershell-and-wmi-or-cim-to-view-and-to-set-power-plans/