Storing the BitLocker key safe is essential. Here’re the steps to back up the BitLocker recovery key from the Control panel and PowerShell command.
BitLocker is the built-in Windows encryption system. It allows you to encrypt any internal or external drive. This makes it so that only authorized persons can access the data in the encrypted drive. In fact, you can even encrypt the entire operating system with BitLocker. One of the best things about BitLocker is how secure and easy it is to use. Add to that, since BitLocker is baked right into Windows, you don’t have to install any other software, as long as you are using the Windows Pro edition.
While encrypting a drive, it gives you a few options to back up the BitLocker recovery key. The recovery key is helpful to decrypt and recover data when you forgot or lost the BitLocker password. If you did not create a backup while configuring BitLocker on a driver, you could still create additional recovery key backups as long as you have the BitLocker password of the encrypted drive. It is pretty easy to do.
This quick Windows guide lets me show you how to back up the BitLocker recovery key.
Table of contents:
Note: Before proceeding, unlock the BitLocker drive. After backing up the recovery key(s), you can lock the drive. If you are wondering, BitLocker doesn’t allow backing up keys while the drive is locked/encrypted for apparent reasons.
Backup BitLocker Recovery Key From Control Panel
The Control Panel provides an easy way to back up the BitLocker recovery keys. All it takes is a couple of clicks, and you will have your BitLocker backup key in seconds. Let me show you the exact steps.
- Open the Control Panel.
- Set “View by” to “Large icons.”
- Click on “BitLocker Drive Encryption.”
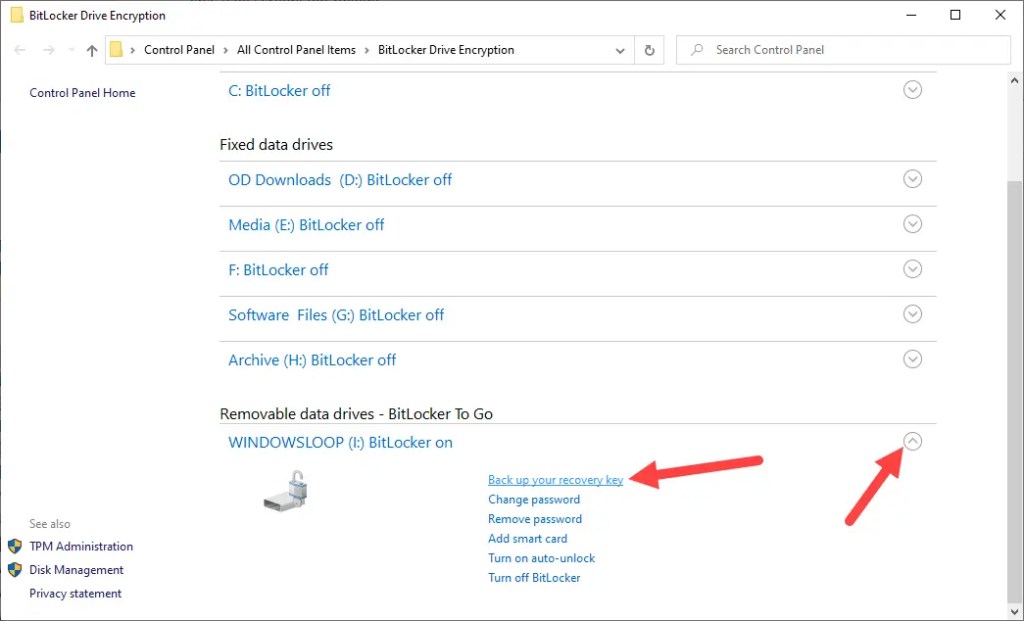
- Expand the BitLocker drive.
- Click the “Back up your recovery key” link.
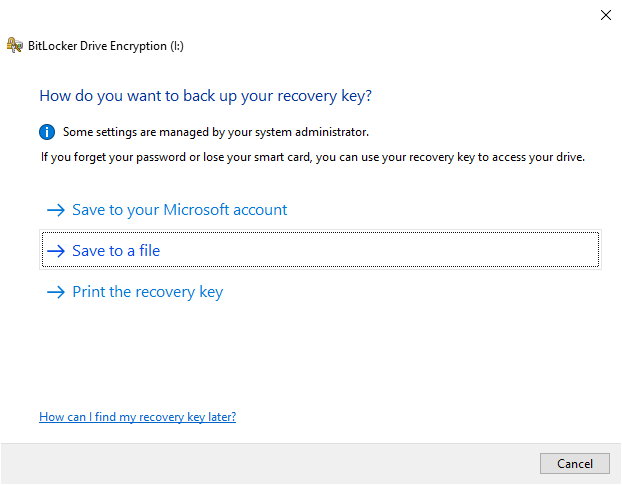
- Choose “Save to a file.”
- Select a folder to save the file.
- Click the “Save” button.
- Click “Finish” in the main window.
- With that, you have successfully backed up the recovery key.
Same steps with screenshots and a bit more detail:
1. First, open the Control Panel. You can search for it in the start menu. Once the Control Panel is opened, set the “View by” on the top right corner to “Small icons” or “Large icons.” After that, find and click the “BitLocker Drive Encryption” option.

2. In the BitLocker window, you will see all the drives. Find the BitLocker drive for which you want to back up the recovery key and expand it by clicking on the little arrow icon. Next, click on the “Back up your recovery key” link.
3. The above action will open the recovery wizard. Select the method you want to use for the recovery. In my case, I’m choosing the “Save to a file” option. The next step(s) will be different depending on which option you choose.
Note: If you don’t want to save the BitLocker recovery key locally, I recommend selecting the “Save to your Microsoft Account” option. It saves the BitLocker recovery key to your Microsoft account to access it anywhere and at any time. — https://account.microsoft.com/devices/recoverykey
4. Here, go to where you want to save the recovery key, name the file, and hit the “Save” button.

5. In the BitLocker wizard, click “Finish” to close it.

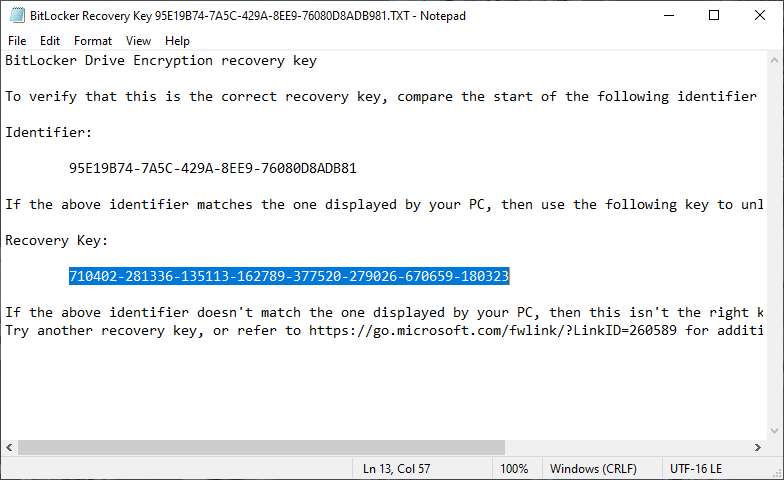
That is it. You’ve successfully backed up the BitLocker recovery key. Open the saved file, and see the key under the Recovery Key heading. I’ve highlighted that part in the below image. You should enter this key when you forget or lose the BitLocker password.
Note: If you chose to save the BitLocker recovery key to your Microsoft account, you could find it using the below links:
PowerShell Command to Backup BitLocker Recovery Key
You can also use a single line PowerShell command to quickly backup the recovery key.
1. First, open the Start Menu, search for “PowerShell,” right-click on the result, and choose the “Run as Administrator” option. This will open an elevated PowerShell window.

2. In the PowerShell window, execute the below command after replacing the “<DriveLetter>” with the drive letter of the BitLocker encrypted drive.
(Get-BitLockerVolume -MountPoint <DriveLetter>).KeyProtector > $env:UserProfile\Desktop\BitLocker_Recovery_Key.txt

3. Once you execute the file, the BitLocker recovery key will be saved as a text file to your desktop. You will not see any response in the PowerShell window. You can close it.

Open the text file, and you will see the recovery key right next to “Recovery Password.” I’ve highlighted that part in the image below.

I hope that helps. If you are stuck or need some help, comment below, and I will try to help as much as possible.
If you like this article, check out how to lock a folder in Windows without using BitLocker.