To spice it up, you can create sticky notes with images and pictures. Here’s how you can add pictures to sticky notes on Windows 10.
Microsoft improved the good old sticky notes app a lot in Windows 10. In fact, there are new features added to the sticky notes app that makes it a bit more useful & worthwhile. Those new features include basic font customization, support for lists, and the ability to add images to sticky notes. Sure, they might not be the advanced features you are looking for but for a simple Sticky Notes app, these are good enough.
While creating sticky notes, there might be times when you need to add pictures. For example, when you want to buy a specific type of product that you don’t know the name of, having an image representation is miles better than you trying to write it in vague terms. Simply put, sticky notes with images is far superior and useful in certain situations.
The good thing is, it is very easy to add pictures to Sticky Notes in Windows 10. All you have to do is select the image in your system and it will be added to the sticky notes.
In this quick and simple guide, let me show you the steps to add a picture or multiple pictures to Sticky Notes.
Steps to add pictures to Sticky Notes
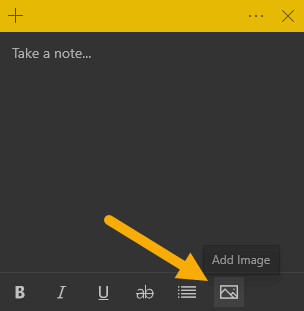
To add pictures to Sticky Notes, click on the image icon on the notes, select the image and click ‘Open’.
For more detailed instructions, follow the steps below.
1. First, open Sticky Notes. You can easily do that by searching for “Sticky Notes” in the Start menu. Alternatively, if Sticky Notes is pinned to the taskbar, click on it.
2. If you already have sticky notes, double-click on the one you want to open. Otherwise, click on the “Add (+)” button to the top-left corner to create a new sticky note.

3. In the new sticky note, click on the image icon in the bottom panel. This is the option that lets you add images to your sticky notes.
4. Select the picture you want to add to the sticky note and click the “Open” button.

That is it. As soon as you click on the open button, the image will be added to the sticky notes. In fact, it is even synced with your Microsoft account so that you can access it on other devices or the web.

Keep in mind that as of writing this, you can only add offline images. You cannot add online images or images with URLs.
Delete images in sticky notes
Just as you can add images, you can also delete pictures in sticky notes. This is particularly helpful if the image is no longer needed or doesn’t serve a purpose any longer.
To delete the image in sticky notes, open the sticky note with the image, right-click on the image, and select the “Delete image” option.

Click on the “Delete” button in the confirmation flyout box.

As soon as you delete the image, it will be removed from sticky notes and unsynced. This action is irreversible. So, think before deleting images in sticky notes.
That is all. I hope that helps. If you are stuck or need some help, comment below and I will try to help as much as possible. If you like this article, check out these useful sticky notes keyboard shortcuts.