How to turn on ransomware protection in Windows 10 & 11
Windows Defender can protect important folders from ransomware. Here is how to turn on ransomware protection in Windows 10 and 11.
Ransomware is proliferating and infecting many systems. Ransomware is dangerous because it can encrypt all your files and hold them hostage until you pay the demanded ransom. No matter who you are or how secure you think your computer is, it is essential that you take additional steps to protect files and folders from ransomware.
To make it happen and protect your data, Windows Security or Windows Defender has a neat feature called “Ransomware Protection.” As the name implies, any folder of your choice from ransomware threats. Since most of our computers contain sensitive information like personal photos, documents, etc., you should consider enabling Windows ransomware protection. That way, your data is safe and sound.
Follow the below steps to turn on ransomware protection in Windows 10 and 11 operating systems.
Table of contents:
The steps below work the same in Windows 10 and 11.
What is Controlled Folder Access
Controlled Folder Access is a newly added feature in Windows Defender. As the name suggests, it protects the system and user-added folders from ransomware. Controlled Folder Access will block applications from accessing the protected folders until Windows Defender deems it safe.
Of course, there will be times when Windows Defender might block a legitimate application from accessing a protected folder.
In those cases, you can instruct Windows Defender to allow the application by adding it to the allowed apps list.
Since no program can access the protected folder without going through Windows Defender, the data in those folders are safe from ransomware and other malicious threats like viruses, malware, etc.
Related: How to enable Windows Defender Sandbox
Turn on Ransomware Protection
You can enable ransomware protection using the Windows Security application. All it takes is toggling a single option, and you are good to go. Here is how.
- Open the Start menu.
- Search and open “Windows Security.”
- Click on “Virus & threat protection.”
- Press on the “Manage ransomware protection” link.
- Turn on the “Controlled folder access” option.
- With that, you enabled ransomware protection.
Steps with more details:
First, open “Windows Security.” You can search for it in the Start menu.

Now, select “Virus and Threat Protection” on the left panel. On the right panel, click on the “Manage Ransomware Protection” link under the Ransomware Protection section.

Toggle the switch under Controlled Folder Access to the “On” position. This action will turn on ransomware protection.

As soon as you toggle the switch, ransomware protection is enabled in Windows 10 and 11.
Protect Folders Against Ransomware
By default, Windows automatically protects the user folders like documents, pictures, etc. To safeguard a custom folder from ransomware, you must manually add it to the Controlled Folder Access. It is pretty simple to do. Here’s how.
To do that, open “Windows Security,” go to the “Virus & threat protection > Manage ransomware protection,” and click on the “Protected Folders” link.

Click on the “Add a protected folder” button to add a folder.
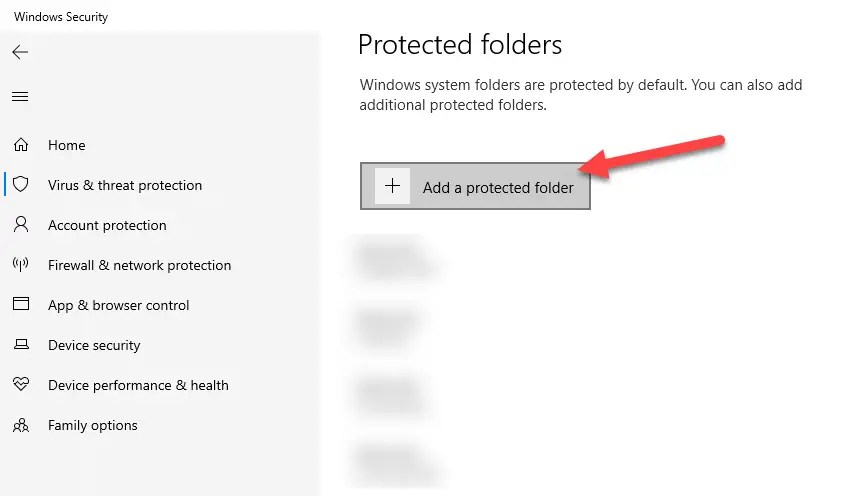
Navigate to where your folder is located, select it and click on the “Select Folder” button.

That’s it. You’ve successfully added a folder to the Ransomware Protection.

Following the same procedure, you can add as many folders as you want to the ransomware protection list.
From this point forward, applications cannot access the protected folders until Windows Defender deems it safe or you manually allow it. Whenever an app is blocked from accessing a protected folder, Windows will display a notification letting you know the same.
If you ever want to, you can remove the folder from secure access by selecting it and clicking on the “Remove” button.

Allow applications to access restricted folders
As I said, once you add a folder to controlled folder access, Windows Defender will block apps from accessing those protected folders.
However, you can manually add a program to the allowed list. This action enables the program to access your system’s protected folders. For example, I protect my work folder with Controlled Folder Access. However, I need programs like Snagit, Calmly Writer, and OneDrive to access that folder. So, I added these applications to the allow list. Here is how to do it.
1. Go back to the Ransomware Protection screen and click on the “Allow an app through Controlled Folder Access” link.

2. Click on the “Add an allowed app” button.

3. You will see two options. If the application you are trying to add has just been blocked, select the “Recently blocked apps” option.

4. Click the “+” button next to the application.

5. It will be added to the allowed apps list.

7. If the app is not in the recent apps list, you can add it manually by browsing for it. To do that, click on the “Add an allow app” button and the “Browse all apps” button.

8. Browse for the application’s exe file, select it and click on the “Open” button.

9. The target application will be instantly added to the allowed apps list.

Once the app has been added, it can access the protected folders without restrictions.
You can add as many apps as you want to the allowed apps list. Unless necessary, don’t give apps access to the protected folders. Also, remember that an app in the allowed list can access all the protected folders in the Controlled Folder Access list.
Wrapping Up
That is all there is to do. It is that simple to enable and configure ransomware protection in Windows 10 and 11.
I hope this simple and easy Windows how-to guide helped you.
If you are stuck or need some help, send an email, and I will try to help as much as possible.
Image credit: Christiaan Colen – Cryptolocker Ransomware