Want to make it easy to manage, share, and transfer MP3 files? This article shows you how to split an MP3 file using the free FFMPEG software.
When it comes to media, FFmpeg is one of the most versatile software of all. You can do so much with that, including dividing an MP3 file into several parts. Now, there are several dedicated software like mp3splt for that exact purpose. However, what makes FFmpeg special is its customizability, ease of use, and, most of all, free and open-source.
If you don’t know, FFmpeg is a small yet handy free and open-source tool mainly used to convert media from one format to another. In addition to that, it also has options for several other things like merging, splitting, etc.
So, without further ado, let me show you how to split MP3 files using FFmpeg.
The steps below work the same in Windows 10 and 11.
Table of contents:
Install FFmpeg on Windows
To start using FFmpeg, you have to install it first. I’ve already written a detailed how-to article on installing FFmpeg in Windows so that you can execute commands directly. Follow that guide and then proceed with the steps below.
Split an MP3 File With FFmpeg
FFmpeg has multiple options and ways to split an MP3 file. For this specific guide, I’m going to show a simple way to break an MP3 file into multiple chunks based on the number of seconds. Here’s how.
- Ensure FFmpeg is installed.
- Go to the folder with the MP3 file.
- Hold “shift” and right-click inside the folder.
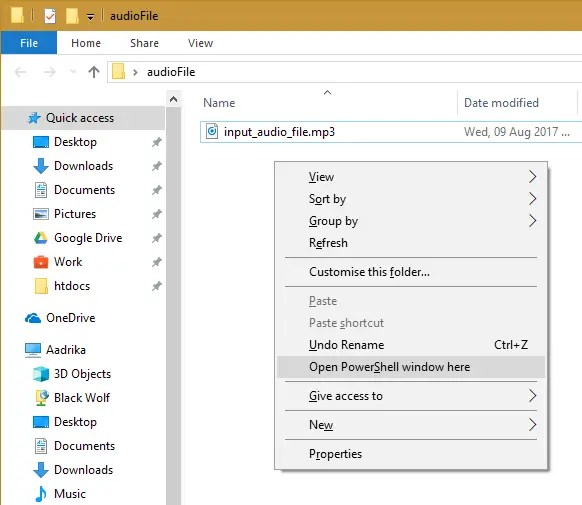
- Select the “Open PowerShell window here” option.
- Run the following command.
ffmpeg -i "input_audio_file.mp3" -f segment -segment_time 3600 -c copy output_audio_file_%03d.mp3 - With that, the MP3 file is split into parts.
- Close the terminal window.
Steps with more details:
First of all, ensure FFmpeg is installed on your PC. After that, navigate to the folder where you’ve stored the MP3 file, shift + right-click on the empty space, and select the “Open PowerShell window here” option.
Windows 11 users can also open the Terminal by selecting the “Open terminal here” option.
Alternatively, you can use the cd command to navigate to the folder within the command line terminal.

Now execute the below command. By default, the below command splits the MP3 file into one-hour chunks using segment muxer.
ffmpeg -i "input_audio_file.mp3" -f segment -segment_time 3600 -c copy output_audio_file_%03d.mp3Don’t forget to replace input_audio_file.mp3 with the actual MP3 file name. You can also change the output file name by replacing output_audio_file_.

To increase or decrease the time, replace 3600 with time in seconds. For instance, if you want one-minute chunks, replace 3600 with 60.
- If you look closely, you will see
%03dattached to the output file name in the above command. This bit of text adds automatic numbering (like 000, 001, 002, and so on) to all the chunks. This ensures that the pieces are in proper order. - If necessary, you can change it to
%02dso that there are only two decimal places, like 00, 01, 02, and so on.
You can also split M4A format audio files using the same command.

Depending on the MP3 file size, it can take a few minutes to split MP3 with FFmpeg. Once completed, you can see all the files in the same directory as the original MP3 file.
—
That is all. It is that simple to split an MP3 file into multiple parts.
I hope this simple and easy Windows how-to guide helped you.
If you are stuck or need help, send an email, and I will try to help as much as possible.
This help me to create a script that cut an mp3 into 5min chunks by right-clicking it. Thanks a lot!
(For my final scrip: https://stackoverflow.com/a/53931416/3154274)
I’m glad it helped you. See you around 🙂
Hi,
Thanks a lot for making splitting a file into multiple files with FFMPEG, so easy and understandable for a windows guy!
Please, continue making great articles!
Best regards,
I’m glad it helped you. Have a nice day.