Are you struggling with Windows Firewall and its settings? Do you want to start fresh and reset your Firewall to its default settings? This how-to guide is here to help you out.
Resetting your Windows Firewall to its default settings can help you fix Firewall-related issues and errors. There may be any number of reasons why you might want to restore Windows Firewall to its original settings. For example, maybe you blocked a program or service unwittingly and now want to revert it, or Windows Firewall is blocking a specific connection after a small modification to the firewall settings, and you don’t know why or which rule is responsible.
No matter the reason, if you ever need, follow the ways and steps in this guide to quickly and easily reset Windows Firewall to its default settings.
Table of contents:
- Restore firewall from Windows Security
- Command to reset firewall to its default settings
- Reset Windows Firewall from Control Panel
- Use Windows Firewall Advanced Security to restore default settings
- Conclusion
Note: Before resetting, backup Windows firewall settings/rules.
1. Restore Firewall From Windows Security
Since Windows Firewall is a security feature, you can reset its settings using the built-in Windows Security app. Here’s how.
- Open the Windows Security app.
- Select Firewall & Network Protection on the sidebar.
- Click the Restore Firewalls to Default link.
- Click the Restore Defaults button.
- Press Yes to confirm the action.
- With that, the Windows Firewall is restored to its default settings.
First, press the Start icon on your keyboard to open the Start menu. Next, search for Windows Security and click on the result to open the Windows Security application.

Once the Windows Security app opens, select Firewall & Network Protection option on the sidebar. This is where you can manage Windows Firewall settings like rules, notifications, advanced settings, etc.
Here, click on the Restore Firewalls to Default link at the bottom of the right page of the app.

The above action will open the good old Control Panel window. Here, click the Restore Defaults button. Windows will show a confirmation prompt; click the Yes button to confirm your action.

As soon as you do that, Windows restores the firewall settings to their defaults.
2. Command To Reset Firewall to Its Default Settings
You also have Command Prompt and PowerShell commands to reset Windows Firewall in your computer. Here’s how to do it.
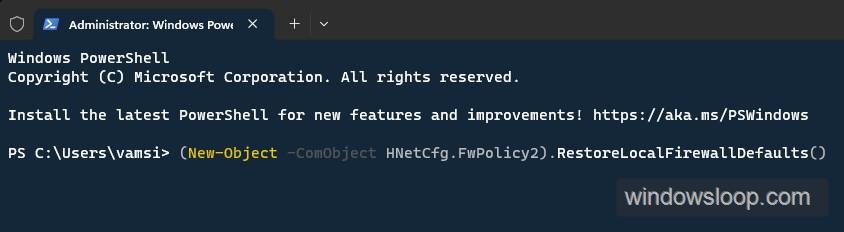
First, open the Terminal application on your computer. You can do that by right-clicking the Windows icon on the taskbar and selecting the Terminal (Admin) option. Windows 10 users can search and open Command Prompt or PowerShell as admin from the Start menu.
In the Terminal window, by default, opens with PowerShell. To open Command Prompt in Terminal, click the dropdown menu on the title bar and select Command Prompt. Next, execute one of the below commands.
PowerShell command to reset Windows Firewall to its default settings:
(New-Object -ComObject HNetCfg.FwPolicy2).RestoreLocalFirewallDefaults()
Command Prompt command to reset Windows Firewall to its default settings:
netsh advfirewall reset

As soon as you execute the command, Windows resets all firewall settings to their default state. Once done, you can close the Terminal window.
3. Reset Windows Firewall From Control Panel
As you’d expect, you can easily reset Windows Firewall to its default settings using Control Panel. Though Microsoft is slowly replacing Control Panel with the Settings app, you can still do so many things in the Control Panel. The best thing is that using the Control Panel is often easier. Follow the below steps.
First, press the Windows key on your keyboard. This will open the Start menu. Now, search for Control Panel and click on the result. This will open Control Panel on your Windows computer.

Once the Control Panel opens, click the View By dropdown menu on the top right corner and select Large Icons. Next, find and click on the Windows Defender Firewall link.

The above action opens Windows Firewall setting page in the Control Panel window. Here, click the Restore Defaults link on the sidebar.

Click the Restart Defaults button on the next page. When prompted, press the Yes button to confirm your action.
As soon as you do that, the Windows Firewall is restored to its default settings.
4. Use Windows Firewall Advanced Security To Restore Default Settings
Of course, last but not least, you can use the Windows Firewall Advanced Security to restore firewall to its default settings. Here’s how.
First, press the Windows key on your keyboard. This will open the Start menu. In the Start menu, search for Windows Defender Firewall with Advanced Security and click on the result. This action opens the Windows Firewall Advanced Security.

Once the advanced settings window opens, select Windows Defender Firewall with Advanced Security on Local Computer on the left sidebar and click the Restore Default Policy option on the right sidebar.

If you see a prompt, click the Yes button. As soon as you do that, Windows resets the firewall to its default settings.
Resetting Windows Firewall — Conclusion
As you can see, if you ever face firewall-related issues or errors, there are four easy ways to reset Windows Firewall to its default settings. No matter which method you choose, all it takes is a couple of clicks. I recommend following the Windows Security app method as it is really easy and consistent. Most of all, it is a future-proof way (mostly). i.e., even if Microsoft retires Windows Firewall Advanced Settings or Control Panel, it will work.
—
That is all. It is that simple to reset the built-in firewall in Windows to its default settings.
I hope this simple and easy Windows how-to guide helped you.
If you are stuck or need help, email me, and I will try to help as much as possible.