The lock icon indicates the file/folder is encrypted. If you don’t want that, Here’s how to remove the overlay lock icon on encrypted files.
Windows provides several different built-in methods to encrypt folders and files. For instance, you can use the BitLocker tool or use the NTFS permissions to encrypt the target folder. When a folder is encrypted using the built-in options, you will see an overlay lock icon on that specific folder. As you can guess from the lock icon, it is mainly there to indicated that the target folder is encrypted and locked. Just by looking at it, you will know that the folder or file is protected.
Now, for the most part, the lock icon serves its purpose. However, it also highlights the said folder like a beacon. This, in turn, attracts the curious eyes. If you don’t want that and want the encrypted folder or file to look like any other file or folder, you need to remove the overlay lock icon.
Thankfully, it is pretty easy to do. So, without any further delay, let me show the steps to remove the overlay lock icon on encrypted folders and files in Windows.
Note: The steps demonstrated below can also be followed in Windows 7 and 8.
Steps to Remove Overlay Lock Icon on Folders & Files
Windows has no straightforward way to remove the overlay lock icon. For instance, there is no checkbox to get the job done. Rather, we need to edit the registry. The good thing is, all you have to do is create a new value and you are done. That being said, before making any changes, please back up the registry just to be safe.
Also, download this blank icon, extract the zip file and place it somewhere safe in your hard drive. We are going to need in the coming steps.
1. First, open the start menu, search for “Registry Editor” and click on the first result to open the registry editor. After opening the registry editor, copy and paste the below path in the address bar and press Enter to go to the folder.
Note: If you are using Windows 7 or 8, manually expand the folder structure on the left panel until you reach the last folder in the below path.
HKEY_LOCAL_MACHINE\SOFTWARE\Microsoft\Windows\CurrentVersion\Explorer\

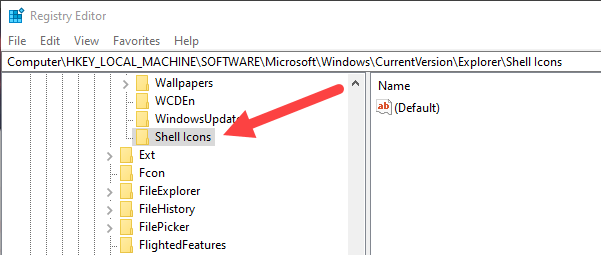
2. Under the Explorer folder, see if there is a “Shell Icons” folder. If it exists, skip this step and proceed from step 3. Otherwise, right-click on the “Explorer” folder, select “New → Key” and name the new folder as “Shell Icons”.

3. After creating the Shell Icons folder, right-click on it and select the “New → String Value” option. This action will create a new string value on the right panel. Name the value as “178” and press Enter to confirm it.

4. Once you’ve created the string value, we need to set its Value Data. To do that, double-click on the newly created value. In the Value Data field enter the full path of the blank.ico file you downloaded and saved. Click on the “Ok” button to save changes.

5. Close the registry editor and reboot Windows.
Wrapping Up
That is all. After restarting, you no longer see the lock icon over the encrypted folders and files. As you can guess from the steps, all we are doing is to replace the lock icon with a blank icon. If you ever want to restore the overlay lock icon, you just need to delete the “178” value you created in step 3.
I hope that helps. If you are stuck or need some help, comment below and I will try to help as much as possible.