If you are not using Move to OneDrive option, let me show how you can remove Move to OneDrive option from the right-click menu in Windows.
In the recent iteration of OneDrive, Microsoft added a new option to the right-click menu called “Move to OneDrive”. This option appears when you right-clicking on a file in Windows. As soon as you click on the option, the file is moved to OneDrive which in turn is synced to OneDrive cloud if the OneDrive app is running in the background.
As you can guess, the Move to OneDrive option in the right-click context menu is very useful in certain situations. After all, it eliminates the need to manually cut and paste the file.

Personally, I like the feature. However, I’ve never used it because I always copy files to OneDrive folder rather than move them. Now, though the feature is pretty good for most people, I have one gripe with it. That is, rather than adding it to the Send To menu, Microsoft chose to add it to the top section of the right-click context menu. This, in turn, gets on my nerves from time to time because of how easy it is to accidentally click on it. In case you don’t know, the top section of the right-click menu consists of important options like Open, Open with, Open with some application, Run as administrator, etc.
So, if you are like me here’s a simple way to remove Move to OneDrive option from the right-click context menu in Windows.
Like for most context menu items, the Move to OneDrive option can be removed by modifying the Windows Registry. Before making any changes, back up registry just to be safe.
Note: To make things easier, I’ve provided downloadable reg files at the bottom of the post.
Remove Move to OneDrive Option in Right-click Menu
1. Open the start menu, search for “Registry Editor” and click on the result to open it. Now, copy the below path, paste it in the address bar and press Enter to go to the target folder.
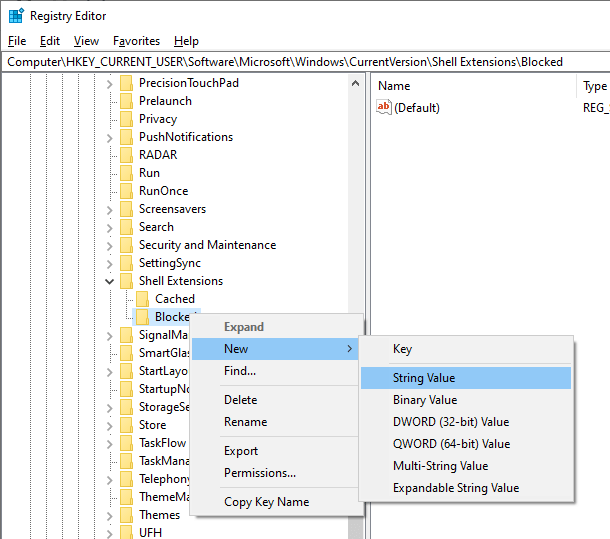
HKEY_CURRENT_USER\Software\Microsoft\Windows\CurrentVersion\Shell Extensions\Blocked
Note: If there is not “Blocked” folder, create one. To do that, right-click on the Shell Extensions folder, select “New → Key” and name the folder as “Blocked”.

2. On the “Blocked” folder, right-click and select the “New → String Value” option. Name the new value as “{CB3D0F55-BC2C-4C1A-85ED-23ED75B5106B}“.

3. That is it. Close the Registry Editor and reboot Windows. You will no longer see the Move to OneDrive option in the right-click context menu.
If you ever want the add Move to OneDrive option back, simply right-click on the value we just created and select the “Delete” option. This action will delete the string value and restores the Move to OneDrive option in the context menu.
Download Reg Files
If you don’t want to manually edit the registry then download this zip file and extract it to your desktop. To remove the option, double-click on the “Remove Move to OneDrive from context menu.reg” file. You will see a warning message. Click on the “Yes” button. Reboot Windows to make changes take effect. The Move to OneDrive option will be removed on the next reboot.
To restore the option, execute the “Add Move to OneDrive to context menu.reg” file.
If you are curious, you can open the .reg file with Notepad to see what keys and values we are changing.
That is all. I hope that helps. If you are stuck or need some help, comment below and I will try to help as much as possible.
If you like this article, do check out how to clean up the right-click context menu in Windows. A very useful article if your context menu is cluttered with useless options.