This article shows you how to remove the Linux entry from the File Explorer navigation pane.
Wondering why there is a new entry called Linux in File Explorer’s navigation pane? It’s because you installed the Windows Subsystem for Linux (WSL). Even if you don’t install WSL manually, third-party apps can enable this feature. For example, if you install BlueStacks to run Android apps on Windows, it might automatically install WSL, which in turn adds the Linux entry in the File Explorer. In case, you don’t know, WSL makes it possible to run a Linux-based operating system directly on your Windows computer without dual-booting. WSL makes life easier for developers and Linux enthusiasts.

To make it easy to access Linux files, Microsoft added the Linux entry to the File Explorer. Clicking on it will show the installed distro that lets you access all the files and folders of that specific distro.
Generally, the Linux entry in File Explorer is pretty useful. However, if you don’t need it or don’t remember installing WSL, follow the below steps to remove the Linux entry File Explorer.
Table of contents:
Remove Linux entry in File Explorer
To remove Linux entry from File Explorer, you have to access the registry and change the System.IsPinnedToNameSpaceTree dword value. This method will not uninstall WSL from your computer. This means you will get to keep WSL and remove Linux entry, the best of both worlds. Here’s how to do it.
Note: Since you are editing the registry, create a registry backup to be safe. It allows you to restore the registry when needed.
Step 1: First, open the Registry Editor from the Start menu. Alternatively, type ‘regedit’ in the Run window (press the Windows key + R).

Step 2: Once the registry opens, paste the “Computer\HKEY_CURRENT_USER\Software\Classes\CLSID” path in the address bar and tap the Enter key on your keyboard. This action will take you to the CLSID folder.
Step 3: Now, right-click on the CLSID folder and select the New -> Key option to create a sub-folder under it.
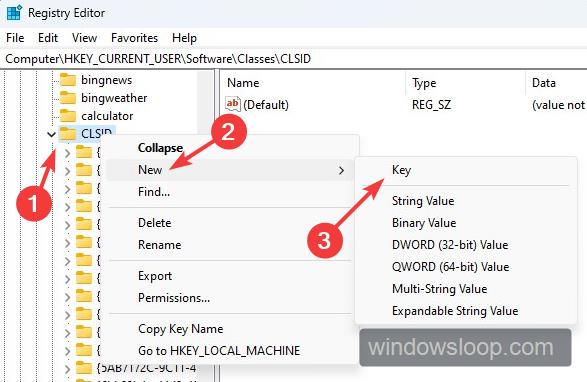
Step 4: Use “{B2B4A4D1-2754-4140-A2EB-9A76D9D7CDC6}” (without quotes and including curly brackets) as the sub-folder name.

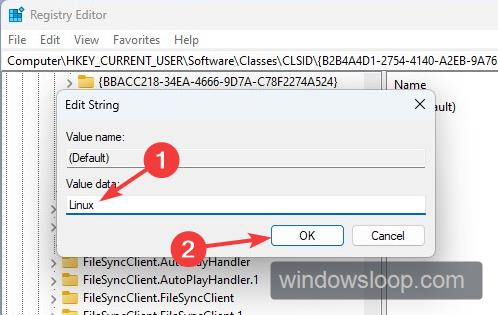
Step 5: After creating the sub-folder with curly brackets, double-click on the “Default” value, type “Linux” in the Value Data field, and click “Ok.”
Step 6: Right-click on the “{B2B4A4D1-2754-4140-A2EB-9A76D9D7CDC6}” folder and select the New -> DWORD (32-bit) Value. This will create will a new dword value.

Step 7: The above action will create a new blank dword value. Name the new dword value as “System.IsPinnedToNameSpaceTree” (without quotes).
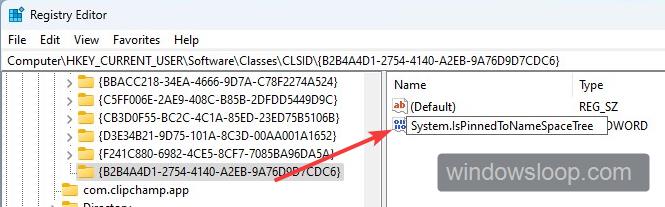
Step 8: By default, the value data of the newly created value is set to 0. To verify it, double-click on the “System.IsPinnedToNameSpaceTree” value and make sure the value data field is set to “0.” Click the “Ok” button to save changes.

Step 9: Finally, close the Registry and reboot the computer. After rebooting, the Linux entry is removed in File Explorer.

Uninstall WSL to remove Linux entry in File Explorer
Uninstalling WSL in Windows also removes the Linux entry from File Explorer. This method is helpful if you don’t need or want to use WSL. Here’s how to do it.
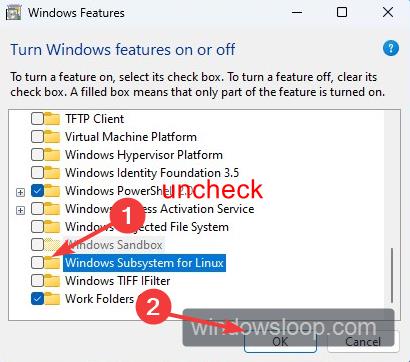
Step 1: Press the Start key on your keyboard. Search for “Turn Windows features on or off” and click on the relevant search result.

Step 2: Scroll down the list of optional features, uncheck the “Windows Subsystem for Linux” option, and press the “Ok” button.
Step 3: Windows will uninstall WSL and asks you to restart the system. Click the “Restart now” button.
Step 4: The Linux folder is removed from File Explorer automatically in the system restart process.
Do keep in mind that if you are using any application that requires WSL, BlueStacks for example, it might stop working or not work as expected. In that case, you have to re-install WSL.
—
That is all.
I hope this simple and easy Windows how-to guide helped you.