You can mount FTP as a network drive in Windows. Here is how to map FTP as a network drive in Windows 10 & 11 File Explorer.
Windows allows connecting to any network share from File Explorer as long as the network discovery feature is turned on. Apart from the regular network shares, you can also access FTP drives directly from File Explorer. For convenience, you can also mount FTP as a network drive in File Explorer. i.e., add FTP network location in Windows File Explorer. Let me demonstrate.
Table of contents:
Why add an FTP network location in Windows?
Mounting FTP as a network drive has one significant advantage. If you’re wondering, mapping FTP as a network drive is handy in everyday life. For example, you can use Windows File Explorer to access your Android phone’s file system by setting up an FTP server on the phone. This enables fast and straightforward file transmission between Android and Windows.
The regular FTP connection is not as fast as a wired connection but provides more flexibility. Most of all, you don’t have to deal with wires and other cumbersome programs.
So, without further ado, let me show you how to map FTP as a network drive in Windows 10 and 11 operating systems.
Requirements
Before we begin, I’ll assume you already have the FTP details, such as the FTP address, port number, username, and password. You can get all this information from your FTP server application or provider.
Related: How to map a WebDAV drive in Windows.
The steps below work the same in Windows 10 and 11.
Map FTP as a network drive
Here’s what you should do to mount or map FTP as a network drive in Windows File Explorer.
- Start the FTP server.
- Open the File Explorer.
- Right-click on “Network” on the sidebar.
- Select the “Map network drive” option.
- On Windows 11, click the “Connect to a website that you can use to store your documents and pictures” link.
- Press “Next.”
- Select “Choose a custom network location.”
- Press “Next.”
- Type the “FTP Address/URL” and press “Next.”
- Uncheck the “Log on anonymously” checkbox.
- Give the connection a name.
- Type the username and press “Next.”
- Select the “Open this network location when I click Finish” option.
- Click “Finish.”
- Type the FTP password when prompted.
- Press the “Log on” button.
- You should be logged into the FTP server.
- The FTP is added as a network location in Windows.
- You can see it in “This PC” or under the “Network” section on the sidebar.
Steps with more details:
First, ensure the FTP server is running and that you have all the necessary information, such as the username, password, FTP URL, and port number.
Once you have the details, use the “Win + E” keyboard shortcut to launch File Explorer. Alternatively, you can also click the File Explorer icon on the taskbar.
After launching File Explorer, right-click on the “Network” section in the sidebar and select “Map network drive.” You can also go to the “This PC” page in Windows 10 and select “Computer > Add a network location.”
Note to Windows 11 users: Click the “Connect to a website where you can keep your papers and photographs” link at the bottom.

Click on the “Next” button in the wizard.

Select the “Choose a custom network location” option and click the “Next” button to continue.

Enter the FTP URL and port number, separated by :. For example, the address of my local FTP server is 192.168.0.101, and the port number is 8899. So I typed in ftp://192.168.0.101:8899. Click the “Next” button to continue.

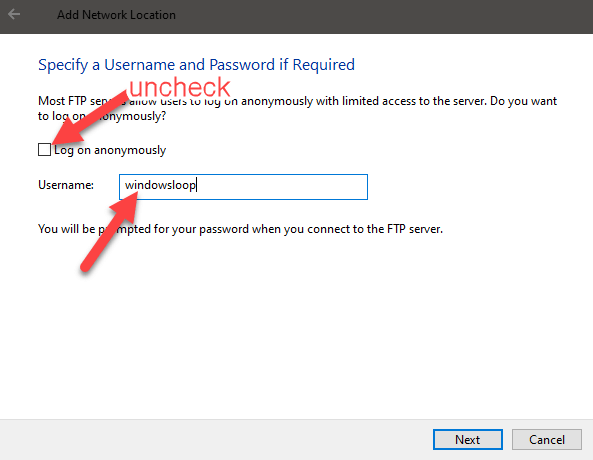
Uncheck the “Log on anonymously” checkbox. Enter the FTP username in the blank field and click “Next.”
If the FTP server is set to allow anonymous access. i.e., without a username and password, you can leave the “Log on anonymously” checkbox selected.
Name the new connection. This name will appear in the Network Locations section of File Explorer.

Select the “Open this network location when I click Finish” box and then click the “Finish” button.

Windows will now attempt to connect to the FTP server. Enter the FTP password when prompted. Select the “Save Password” checkbox and click the “Log on” button.

If everything goes as planned, you will be logged into the FTP server via File Explorer. The FTP connection is added as a network drive under the “Network” section. From here, you can use it like any other drive.

If you go to File Explorer’s “This PC” page, you will see that the FTP connection is mapped as a drive. From now on, you can double-click on the mapped FTP drive and access the FTP server as long as it is online.

—
That is all. It is that simple to add FTP as a network drive in Windows 10 & 11.
I hope this simple and easy Windows how-to guide helped you.
If you are stuck or need some help, send an email, and I will try to help as much as possible.
that doesnt work anymore it gives an error and forces you to open internet explorer instead folder view.
I’ve just tested it on my end and it worked fine.
That being said, the thing you are saying happened to me once and it resolved itself after some time. Unfortunately, I don’t know the reason why it happened to me.