This article details what is a system restore, what it does, how to create a restore point & how to restore Windows using a restore point.
No matter how careful you are when making changes to Windows, things will go wrong at times. It can happen in a variety of situations, such as when editing the Registry, installing driver updates, changing settings you’re not sure about, and so on.
To help you in those situations, Windows has a built-in tool called System Restore. It enables you to create a restore point and save it to the disk. If you don’t know, a restore point is like a snapshot of the current working state. You can then use that saved restore point to restore Windows to its known good state.
As you can guess, in case of emergencies, the System Restore feature can save hours of unnecessary work, like reinstalling Windows and other software. Not to mention the agony of configuring all of that software.
To get you started, this article will explain what system restore is, what it can and cannot do, how to create a restore point, and how to restore Windows using System Restore.
Table of contents:
- What can System Restore do?
- What System Restore cannot do?
- How to enable System Restore in Windows 10 & 11
- How to create a restore point in Windows
- How to restore Windows using System Restore
The steps below work the same in Windows 10 and 11.
Before getting started, you should be aware of what System Restore can and cannot do when you choose to restore your system. This gives you a better idea and judgment in creating and restoring system restore points.
What can System Restore do?
Here’s what happens when you use System Restore to restore Windows.
- Uninstall programs that you’ve installed after creating a restore point.
- Uninstall Windows updates that were installed after creating the restore point.
- Install programs that were present when creating the restore point but uninstalled after creating a restore point. Same for Windows updates
- Restore all changes made to the system files, including Registry and Group Policies.
- Restore Windows Settings.
What System Restore cannot do?
Here’s what the System Restore cannot do when you restore Windows from a restore point.
- System Restore will not delete or restore your personal files. For instance, files in folders like Pictures, Downloads, Documents, etc., will not be touched by System Restore.
- Remove or clean viruses or malware. Mostly any infections will be unaffected. Use a good anti-virus or malware program to get rid of them.
- Restore or recover deleted data. System Restore is not a data recovery program. For that, you need to use data recovery software.
Now that we’ve gotten that out of the way, let’s look at how to use System Restore in Windows.
How to Enable System Restore in Windows 10 & 11
System Restore is disabled by default. To create a restore point, you have to first enable it. Follow the below steps to turn on System Restore in Windows 10 and 11.
- Press the “Start” key.
- Search and open “View advanced system settings.”
- Go to the “System Protection” tab.
- Select “Local Disk (C:).”
- Click the “Configure” button.
- Select “Turn on System Protection.”
- Use the “Max Usage” slider to adjust disk space.
- Press “Ok.”
- With that, the System Restore is turned on.
Steps with more details:
First, search for “View advanced system settings” in the Start menu and open it.
The above action will open the “System Properties” window. Here, navigate to the “System Protection” tab. Select the “Local Disk (C:) (System)” under the “Protection Settings” section and press the “Configure” button.

Select the “Turn on system protection” option to enable System Restore. After that, drag the slider under the “Disk Space Usage” section to assign the maximum space system restore can use. When sliding, Windows will show the actual space you are allotting in GBs. Click the “Ok” button to save changes.
Tip: As a general rule, allocate 10% to 15% of your C drive space. This ensures that you will have a number of restore points to choose from. When there is no more space, Windows deletes old restore points to make room for new ones.

That’s it; you’ve successfully enabled System Restore in Windows.
In the future, if you believe you no longer require System Restore, you can turn it off. To do so, go to the “System Protection” tab and select the “Disable system protection” option.
How to Create System Restore Point
After enabling System Restore, you can create a system restore point at any time, like before editing Registry or changing Group Policy settings. Make a habit of creating a system restore point when making significant system changes, installing or uninstalling software, etc. Here is how to create a restore point in Windows.
- Launch the Start menu.
- Search and open “Create a restore point.”
- Go to the “System Protection” tab.
- Select “Local Disk (C:).”
- Press the “Create” button.
- Type a short description in the blank field.
- Press the “Create” button.
- It will create the restore point.
- Press “Close” once done.
- With that, you’ve created a restore point in Windows.
Steps with more details:
First, press the Start key on your keyboard, search for “create a restore point,” and open it.

The above action will open the “System Properties” window. Select the “Local Disk (C:)” option under “Protection Settings” and then click the “Create” button.

You will be prompted to describe the system restore point you are about to create. Type a meaningful description in the blank field and press the “Create” button.

That’s it; Windows will start the process of creating a system restore point.

Once the restore point has been created, it will let you know the same. Click the “Close” button, and you are done.

How to restore Windows using System Restore
The restore point helps you restore Windows when you think your system is not working as it should or revert the changes you just made.
The Windows system can be restored in two methods.
The first is useful when you are able to boot into your Windows PC.
The second is useful when you are unable to boot into Windows. For instance, when you mess up a Registry entry or a critical system file, it might corrupt Windows in such a way that you cannot boot into it. In those situations, follow this second method.
I will show both ways. Follow the one you think meets your current need.
Restore Windows When You Can Boot into
When you can boot into Windows, restoring Windows using a restore point is simple. Here’s how.
- Click “Start” on the taskbar.
- Search and open “Create a restore point.”
- Go to the “System Protection” tab.
- Click the “System Restore” button.
- Click “Next.”
- Choose a restore point.
- Press “Next.”
- Press “Finish.”
- Click “Yes” if prompted for confirmation.
- Windows starts to restore the computer.
Steps with more details:
Search for “Create a restore point” in the Start menu and click the result to open it.
After opening it, ensure you are in the “System Protection” tab. If not, go to it. Now, click the “System Restore” button.

The above action will open the System Restore wizard. Click the “Next” button to continue.

The wizard will show all the available restore points. Select a restore point from the list and click “Next” to proceed.
Tip: selecting a restore point and clicking the “Scan for affected programs,” button shows all the programs and drivers affected by the system restore you are about to perform.

Finally, click “Finish.” You might receive a warning message; click “Yes” to continue.
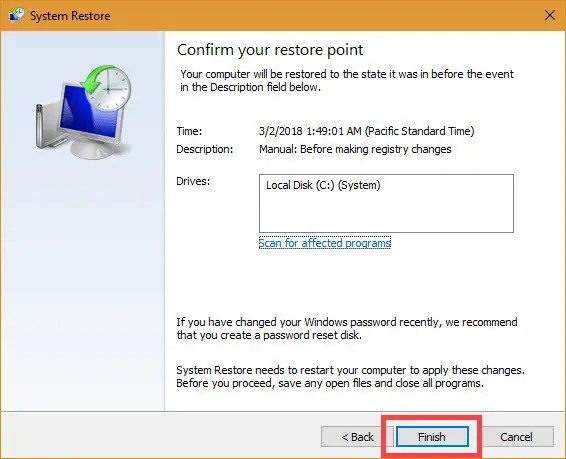
Depending on your system, it can take a few minutes to complete the system restoration. So, sit back and wait until the procedure is complete.
Restore Windows when you cannot boot
When you cannot boot into Windows, you cannot follow the above procedure. In those situations, you can use Advanced System Settings to restore Windows. Follow the below process, and you should be good.
- Try to start Windows three times.
- Windows shows the “Advanced Settings” screen.
- Click the “Troubleshoot” option.
- Go to the “Advanced Options” page.
- Click “System Restore.”
- Select the user account.
- Type the user account password.
- Press the “Continue” button.
- Press “Next.”
- Choose a restore point.
- Press “Next.”
- Press “Finish.”
- Click “Yes” if prompted for confirmation.
- Windows starts to restore the computer.
- You can log into Windows after restoring.
Steps with more details:
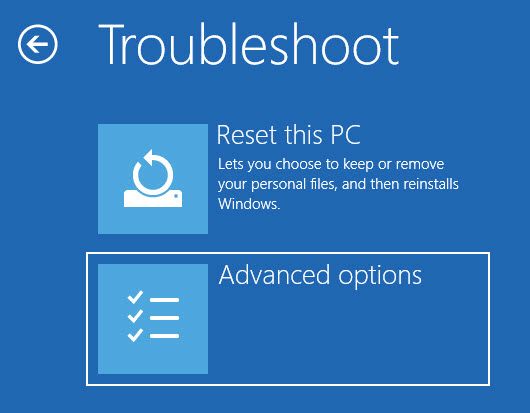
First and foremost, attempt to boot your system. It will not boot. When this happens three times, Windows displays the Advanced Settings screen. Click the “Troubleshoot” button.
Note: If you cannot see the advanced options, plug-in Windows bootable media and select “Repair” on the installation screen. It will take you to the Advanced Settings screen.

Click the “Advanced Options” menu on the Troubleshoot page.
Locate and select the “System Restore” option.

Windows will prompt you to select and authenticate your account for security reasons. So, choose your account.
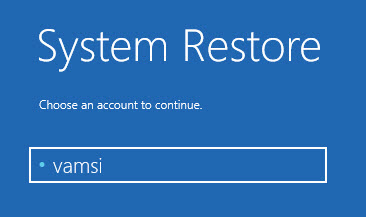
Enter the user account password on the next screen and click the “Continue” button.

As soon as you do that, the System Restore window will open. Click the “Next” button to continue.

Choose a restore point from the list and click “Next.” Selecting a restore point and clicking the “Scan for affected programs” will show all the affected programs, updates, and drivers due to the restore point.

Click the “Finish” button. You might see a warning message; click the “Yes” button to continue.

If everything goes well, your system will be restored within a few minutes. After restoring, you can log into Windows normally.
Wrapping Up
As you can see, enabling and creating a system restore in Windows is very simple and easy. After creating a restore point, restoring is also pretty easy.
As I said earlier, before making significant changes like editing the registry, changing group policy settings, installing or uninstalling drivers and programs, make a habit of creating a system restore point. It just takes a couple of minutes.
The restore point will save you a few hours of installing and configuring Windows.
Then again, remember the limitations of System Restore. It is not an alternative to the actual system backup. For better protection, create a full system backup.
—
I hope this simple and easy Windows how-to guide helped you.
If you are stuck or need some help, send an email, and I will try to help as much as possible.