When you plug in a new device, Windows automatically detects and readies it so you can use it. However, if Windows doesn’t automatically detect when you connect a new device, you can force Windows to scan for hardware changes. Whether it’s a new printer, scanner, or any other device, knowing how to scan for hardware changes can save you time and frustration in getting your hardware up and running.
There are two ways to initiate the scan for hardware changes on Windows; you can either use the Device Manager or execute a single-line command in the Command Prompt window.
In this quick and easy guide, I will show both methods to scan for hardware changes in your computer. Both of these methods can come in handy when you’ve connected new hardware to your computer, and it’s not detected automatically. Let’s get started.
Table of contents:
How To Scan for Hardware Changes in Device Manager
All hardware devices can be managed from the Device Manager. As such, if Windows does not detect a newly connected device or changes to a device, you can use the Device Manager to scan and refresh hardware devices. Here’s how.
- Right-click on the Start icon on the taskbar.
- Click on the Device Manager option.
- Click the Actions option at the top.
- Select the “Scan for hardware changes” option.
- Windows immediately scans and lists all the hardware changes.
- You can close the Device Manager.
First of all, we need to open the Device Manager. To do that, right-click on the Start icon on the taskbar and click on Device Manager from the list of power user menu options. You can also open Device Manager by searching for it in the Start menu.

Once the Device Manager opens, right-click on your computer name at the top of the list and select the Scan for Hardware Changes option. Alternatively, you can also click the last icon at the top (I’ve highlighted it in the image).

As soon as you do that, Windows scans and lists all the hardware changes.
Once that is done, you can close the Command Prompt window.
Command To Scan for Hardware Changes
Windows has a dedicated command to quickly scan for any and all hardware changes. You can execute this command in PowerShell or Command Prompt.
First, right-click on the Start icon to open the power user menu. You can also press the Windows key + I keyboard shortcut. From the list of options, click on the Terminal (Admin) option. This action will open Terminal in Windows with admin rights.
The terminal window, by default, opens with the PowerShell tab. If you want, you can open the Command Prompt tab by clicking on the down arrow icon on the title bar and selecting Command Prompt. As I said earlier, the command works in both PowerShell and Command Prompt. So, it doesn’t matter what you use.
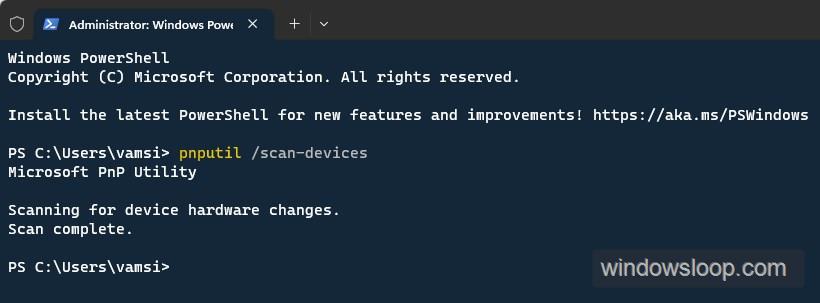
In the terminal window, run the pnputil /scan-devices command.
As soon as you run the command, the system will scan for device hardware changes and lists them. You will see the success message ‘Microsoft PnP Utility. Scanning for device hardware changes. Scan complete.’
Once the scan is done, you can close the terminal window.
Scanning for New Hardware — Conclusion
As you can see, you have two ways to scan for new hardware or hardware changes on Windows. You can either use the Device Manager or the command as shown above. Generally, I recommend you follow the Device Manager as it is easy. However, if it doesn’t work or if you want to create custom scripts, you can follow the Command Prompt method. No matter which method you choose, the job will be done in just a couple of clicks.
I hope this simple and easy Windows how-to guide helped you.
If you are stuck or need help, email me, and I will try to help as much as possible.