Don’t want to run a scheduled task right after turning on the computer? Follow these steps to delay scheduled tasks in Windows 10 and 11.
When you want to execute a task at a specific time or event, you can use the Windows Task Scheduler. As the program name suggests, the Task Scheduler program lets you execute a task later based on specific events and triggers. For example, if you want to launch a program at a particular time or the startup, you can certainly use the Task Scheduler to do that. If needed, you can create recurring events to automate daily tasks. All in all, the Task Scheduler is a hugely helpful program that is powerful yet easy to use.
Generally, when you configure a task in the Task Scheduler, it is triggered almost instantly if the trigger is met. For instance, if you configure a task to start at system startup, it will be initiated immediately at the system startup. This is how it should and will work. However, there might be situations where you need the task to run with some delay. For instance, maybe you want a program to start at system startup but with some delay to not affect the overall system startup time.
Thankfully, you can do that pretty quickly using the delay function in the Task Scheduler. I use this technique to delay OneDrive at the system startup.
In this quick Windows 10 and Windows 11 guide, I will show you how to delay a task in Task Scheduler.
Note: I’m showing this in Windows 10, but the steps will work in Windows 11 too.
Delay a task in Task Scheduler
To start, I assume you know how to or have already created a scheduled task that you want to delay. If not, open the Task Scheduler, click the “Create a basic task” option and follow the wizard to create a new scheduled task. Once you have the scheduled task, follow the steps below.
First, open the Start menu, search for “Task Scheduler,” and click on the appropriate result to open the Task Scheduler. After opening it, find a task you want to delay, right-click on it and select the “Properties” option.

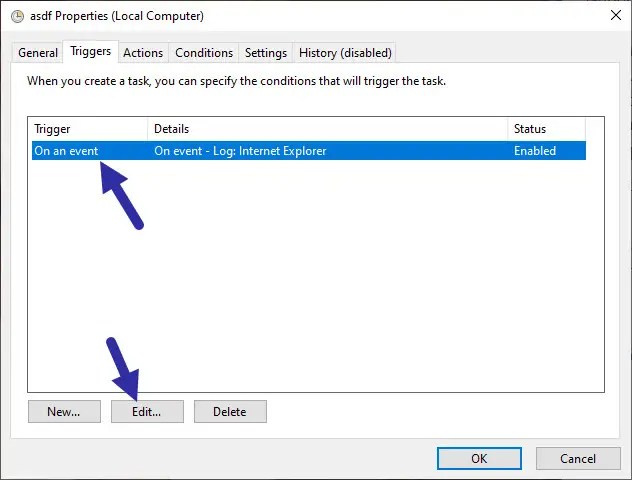
The above action will open the task properties window. Here, go to the “Triggers” tab. Next, select the trigger and click the “Edit” button.
Now, select the “Delay task for” checkbox and select the delay time from the dropdown next to it. I chose “15 minutes” as the delay time. Next, click the “Ok” button to save changes. Finally, you can close the main Task Scheduler window.

With that, you are done with setting a delay for a scheduled task. From now on, when the event is triggered, the task will run with a delay you chose earlier.
That is it. It is that simple to delay a scheduled task in Windows.
I hope that helps.
If you are stuck or need some help, comment below, and I will try to help as much as possible.