XLS is the old Excel file format. For compatibility and usability, you can convert XLSX to XLS or XLS to XLSX. Here’s how to do it.
For creating, editing, and managing spreadsheets, there is no better application than Excel. A few reasons for its popularity are an industry standard, countless features, seamless compatibility between versions, ease of use, constant & consistent updates, and more.
When you save a spreadsheet with Excel, it uses the .XLSX extension. As you can tell, this is an official and default Excel spreadsheet extension. Generally, all new versions of Excel will automatically save a spreadsheet in the .xlsx format. However, older Excel versions save spreadsheets in .xls format.
Specifically, Excel versions from 97 to 2003 use the .xls extension, while the newer versions since then use the .xlsx extension. A couple of the main reasons for using a new extension is the number of features and options added to the newer Excel versions and to preserve compatibility between versions. As you can see, the latest upgraded extension supports far more features.
That being said, you can still open, edit, and manage older .xls files in newer Excel versions. However, this might not be the case when you are trying to open a more recent .xlsx extension in an older version of Excel (between 97 & 2003). In that case, you have to convert XLSX to XLS format. In fact, the Excel application even lets you save the new Excel files in XLS format, with some limitations.
If you already have files with XLS or XLSX extensions, you can convert them from XLS to XLSX or XLSX to XLS with just a couple of steps for compatibility reasons.
So, without further ado, let me show you the steps to convert XLS to XLSX and convert XLSX to XLS formats.
Jump to:
How to convert XLS to XLSX
There are two ways to convert an old XLS format to the newer XLSX format. First, you can open the XLS file in a new Excel version and save it in .xlsx format. Alternatively, you can use an online service. I will show both methods follow the one you like.
1. Save XLS as an XLSX file
The easiest way to convert an XLS file to XLSX format is to open it in a modern Excel application (2016 or higher) and save it as an XLSX file. The good thing is, all it takes is a few clicks, and everything is done locally in your machine. If you don’t have Excel 2016 or higher application, I recommend you follow the second method.
- Make sure you have already installed Excel 2016 or higher.
- Find and double-click on the .xls file to open it.
- Click on the “File” option.
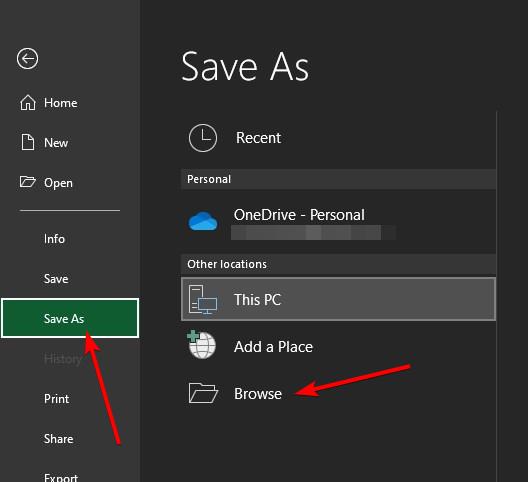
- Click the “Save as” option on the sidebar.
- Press the “Browse” button.
- Go to a location of your choice.
- Set a name in the “File Name” field.
- Select “Excel Worksheet (.xlsx)” from the “Save as type” dropdown menu.
- Click the “Save” button.
- With that, you’ve successfully converted XLS format to XLSX format.
Let us see the same steps in a bit more detail:
First, we need to open the .xls file in Excel 2016 or higher application. So, make sure you’ve installed Excel 2016 or higher. Next, find the XLS file and double-click on it. Alternatively, open the Excel application, click “File,” select the “Open” option, select the .xls file, and click the “Open” button. This action will open the XLS file in Excel in compatibility mode.


After opening the file, click on the “File” option and click the “Save as” option. This will let us save the file in .xlsx format. Next, click the “Browse” button.
Now, go to the location where you want to save the file and type a name in the “File Name” field. Next, select “Excel Worksheet (.xlsx)” from the dropdown menu. This is the option that converts the file from .xls to .xlsx format. Finally, click the “Save” button.

As soon as you do that, Excel will export the .xls file as a .xlsx file. The file is saved in the location you chose earlier. You can now close the Excel window, find the newly saved .xlsx file, and open it.

After opening the converted file, you must verify that the newly exported file is accurate and that the data is unmodified. Due to computability reasons, some cells might get corrupted or modified under certain circumstances. This is especially true for charts and custom formulas & scripts.
2. Use an online converter
If you don’t have a newer version of Excel or it is not working for some reason, you can use a simple online service to convert excel files from one format to another.
Important note: To convert a file online, you have to upload it to their servers. So, make sure there is nothing sensitive or essential in the file and you are comfortable uploading the file to a third party.
- Go to — https://www.zamzar.com/convert/xls-to-xlsx/.
- Click the “Add files” button.
- Select the “.xls” file.
- Click the “Open” button.
- Select “XLSX” format from the dropdown menu.
- Click the “Convert Now” button.
- Click the “Download” button to download the converted file.
- The converted file is downloaded to your computer.


That is it. It is that simple to convert XLS files to XLSX.
How to convert XLSX to XLS
Though not often, there will be times where you need to convert the newer XLSX format file to an XLS format file. For example, maybe your office, organization, or educational institution still uses Excel 2003 or lower. The same is true when working with some older clients. In those cases, follow the below steps to convert XLSX to XLS format.
Important Note: Some features and options might not translate themselves correctly when downgrading XLSX to XLS. This happens because of the compatibility issues with the older .xls format. So, be careful and verify the data integrity once done.
1. Save XLSX as an XLS file
If you have Excel 2016 or higher, you can open the XLSX file in it and export it to .xls format with just a few clicks. It is pretty easy to do, and everything is done locally in your machine. Here is how.
- Open .XLSX file in Excel.
- Click the “File” option.
- Select the “Save as” option.
- Click the “Browse” button.
- Go to where you want to save the file.
- Set a name in the “File Name” field.
- Select “Excel 97-2003 Workbook (.xls)” from the “Save as type” dropdown menu.
- Click the “Save” button.
- The file is instantly exported from XLSX to XLS format.
- You can find the converted file in File Explorer.
Let us see the same steps in a bit more detail:
First, open the .xlsx file in Excel. To do that, double-click on the file. Alternatively, open the Excel application, click “File > Open,” select the “.xlsx” file, and press the “Open” button.
After opening the xlsx file, click on the “File” option again. Next, select “Save as” on the sidebar and click the “Browse” option.
Go to a directory to save the file and set a name in the “File Name” field. After that, select “Excel 97 – 2003 Workbook (.xls)” format from the “Save as type” dropdown menu. Finally, click the “Save” button.

As soon as you do that, the file is instantly exported from .xlsx to .xls format. If there are any compatibility issues, Excel might show a warning during the conversion process.
After converting, you can open the File Explorer and navigate to the location you chose earlier to find the converted file. Open the file and make sure the data is converted correctly. Since we are downgrading from xlsx to xls, verifying the converted data’s integrity and accuracy is essential. This is especially important when charts, formulas, and custom scripts are involved.
2. Use an online converter
You can use a free online service to export XLSX files to XLS. However, remember that we need to upload the file to a third-party service to complete the conversion process. So, make sure you have proper permissions to do so, and there is no sensitive or essential data in the Excel file.
- Go to — https://www.zamzar.com/convert/xlsx-to-xls/.
- Click the “Add files” button.
- Select the “.xlsx” file.
- Click the “Open” button.
- Select “XLS” format from the dropdown menu.
- Click the “Convert Now” button.
- Click the “Download” button to download the converted file.
- The converted file is downloaded to your computer.
That is it. It is that simple to convert XLSX files to XLS.
I hope that helps.
If you are stuck or need some help, comment below, and I will try to help as much as possible.