Want to resize multiple images or pictures at once? Here is a simple way to batch resize multiple images in Windows OS.
If you are someone who works with a lot of images, you might have come into situations where you need to resize multiple images at once i.e, batch resize images. By default, Windows has no built-in function to resize images. That means you have to use a dedicated image manipulation program to resize images one by one. If it’s just a couple of images, resizing them one by one is nothing hard. However, when there are tens or hundreds of images to resize, it can be a daunting task. In that case, you have to use a bulk image resizer to make life easier.
The good thing is, Windows has a ton of applications for almost everything, bulk resizing images is nothing different. Rather than using a full-fledged image manipulation program like Photoshop, you can use small dedicated image resizing applications to get the job done. This makes the whole process a bit more efficient and easy.
In this quick Windows 10 guide, let me show how you can batch resize images in Windows using Microsoft’s PowerToys application.
Batch resize images in Windows
To resize multiple images in Windows, we are using Microsoft’s PowerToys application. Go ahead and get it from the official Github page.
1. First thing, open PowerToys and select “Image Resizer” on the sidebar. On the right panel, turn on the “Image Resizer” option.

2. Open the File Explorer and go to the folder where the images are located. Select the images to resize, right-click on them and select the “Resize pictures” option.

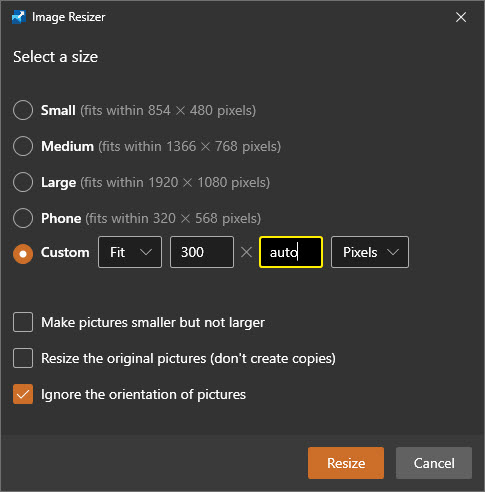
3. Select the resize option of your choice and click the “Resize” button.

4. If you want to, you can select the “custom” resize option. This is helpful if the predefined resize options are not to your liking. To do that, select the “Custom” option and set the width and height in pixels. To make sure the image is proportional, you can set one dimension in pixels and the other to “Auto.” For example, I want the resized image to be 800px wide and the height to be proportional to that width. So, I set the width to 800 pixels and height to “Auto.”
5. As soon as you click the resize button, PowerToys will resize all the images. The resized images are automatically saved to the same folder as the source images. If you want to, you can now delete the original images in favor of the resized images.

That is it. It is that simple to batch resize multiple images at once in Windows.
(Optional) add custom resize option to PowerToys Image Resizer
When needed, you can add custom size to the Image Resizer tool in PowerToys. This is particularly useful if you are constantly using a specific size and don’t want to manually enter it every time.
Open the PowerToys app and click “Image Resizer” on the sidebar. Next, click on the “Add size” button on the right panel.

Now, select the options as shown below:
- Type the name of the size in the first field
- Select “Fit” in the second dropdown menu
- Set width in the third field
- Set height and fourth field
- Select “Pixels” from the last dropdown menu.
If you want Image Resizer to set the width or height proportional to the other dimension, type “0” in the appropriate field. For example, I want the height to be proportional to the width. So, I set the height field to “0.”

The changes are automatically save, you can close the application.
Now, when you try to batch resize images, you will see the custom resize option.

What is PowerToys?
PowerToys is the first-party open-source program from Microsoft that contains several small utility tools. Those utility tools include but are not limited to Image Resizer, Keyboard Manager, Bulk Renamer, Enhanced Run tool, Fancy Zones, etc. The PowerToys tools is being actively developed and new tools are being added regularly.
That is all. I hope that helps you in batch resizing multiple images at once in Windows.
If you like this article, check out how to reduce JPG file size. Very useful to create quick backups, for web uploads, etc.