There is no need to unlock a BitLocker drive manually. Here is how to configure Windows to auto-unlock the BitLocker drive.
BitLocker is the built-in drive encryption tool in Windows. Since Windows 10, Microsoft started automatically encrypting all the drives in Windows with BitLocker if you are logged in with a Microsoft account. That way, even if the device is lost or stolen, no one can access the contents of a drive without proper authorization.
If you reinstall Windows while the drives are encrypted, you might have to unlock them with the BitLocker recovery key. Since the recovery is automatically backed up to OneDrive, you don’t have to worry about it in ‘most cases.’
By default, all drives that are automatically encrypted with BitLocker will be unlocked automatically as soon as you sign in to your user account.
However, if you manually encrypt a drive, you have to unlock it manually. The good thing is that you can configure BitLocker to automatically unlock a drive as soon as you sign in to Windows. That way, you don’t have to type a long and complicated BitLocker password every time. For example, this is particularly useful for things like USB drives, external HDDs, etc.
So, without further ado, let me show you how to auto-unlock BitLocker drive in Windows 10 and 11 operating systems.
The steps below work the same in Windows 10 and 11.
Auto Unlock BitLocker Drive in Windows
To auto-unlock a BitLocker drive, you must manage the drive BitLocker settings from the Control Panel. All it takes is a couple of clicks. Here’s how to unlock a BitLocker drive automatically.
- Unlock the drive if it is not yet unlocked.
- Press the Start key on your keyboard.
- Search and open “Control Panel.”
- Choose “Large icons” from the “View by” dropdown menu.
- Click on the “BitLocker Drive Encryption” option.
- Expand the drive you want to turn on auto-unlock.
- Click the “Turn on auto-unlock” link.
- The drive will unlock automatically once you sign in to your user account.
Steps with more details:
To turn on auto-unlock, the BitLocker drive should be unlocked first. For that, ensure the drive is plugged in, open the File Explorer and double-click on the drive. Type the BitLocker password when prompted and press “Unlock” to unlock.

You can manage BitLocker directly from the Control Panel. So, the first thing to do is open the BitLocker settings. For that, press the Start key on your keyboard. Search and open the “Control Panel.”
By default, the Control Panel will be in Category view. Click the “View by” dropdown menu on the top-right corner and choose the “Large icons” option.

Find and click the “BitLocker Drive Encryption” option in the Control Panel.

The above action will open the BitLocker settings page. Here, expand the drive for which you want to enable auto-unlock. Next, click the “Turn on auto-unlock” link next to the drive.
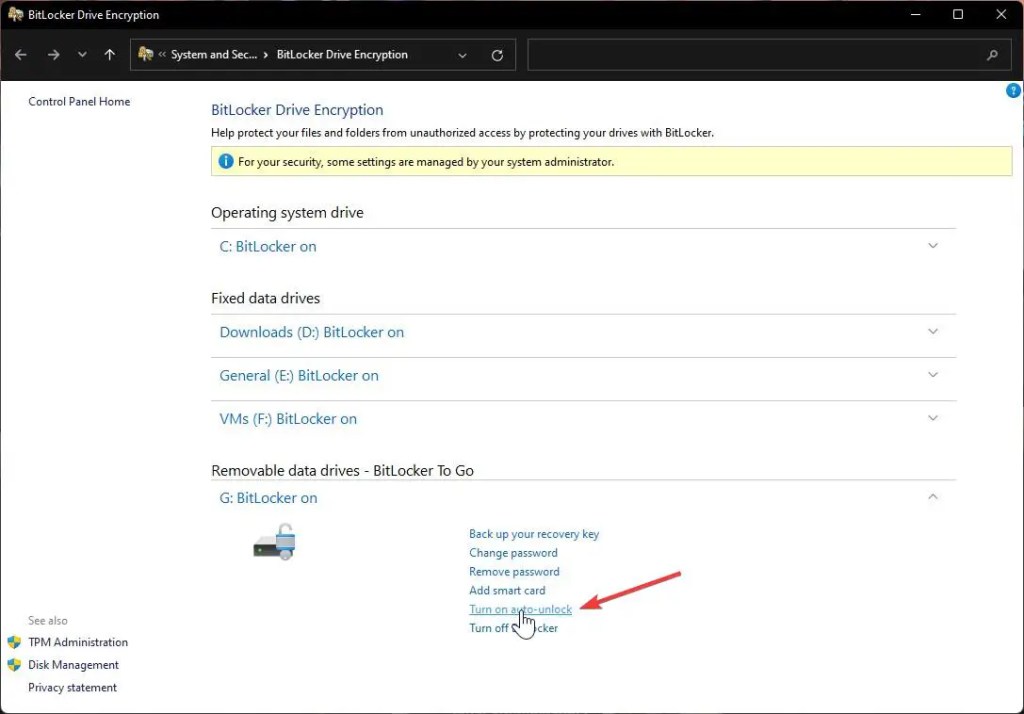
The drive is set to unlock automatically as soon as you do that.
That is it. From now on, the BitLocker drive is unlocked automatically as soon as you sign in to your user account.
Remember that this setting only applies to your computer and when logged into the same user account you used to configure the setting. If the drive is plugged into another system or you are using another user account, the BitLocker encrypted drive will not be unlocked automatically. You have to use the BitLocker password or recovery key. The same is applicable when you reinstall Windows.
–
As you can see, it is pretty simple to turn on auto-unlock BitLocker drive in Windows.
I hope this simple Windows how-to guide helped you.
If you are stuck or need some help, comment below, and I will try to help as much as possible.