Don’t know what your username in Windows 10 is? It is pretty easy to find out. Follow these steps to find user account name in Windows 10.
Every user account in Windows has its own username. In fact, Windows asks you to add a username while creating a user account. As you can guess, a particular user account’s username is used in several different ways and places. For example, the username is used to differentiate between users, create home folders for each user, add permissions, create user-specific environments, set user-specific settings, etc.
In general, most Windows users never need to bother about the username. However, there might be situations where you need to know the username of your Windows user account. Without knowing the username, you cannot configure the settings. For example, if you want to take ownership or change permissions of a folder or file, you need to know the username. The same is true for most advanced Windows settings that target a specific user account.
The good thing is, Windows has several different ways to find Windows username. It’s just that you need to know where you look.
In this straightforward Windows 10 guide, let me show three different ways to find user account name in Windows 10.
1. Find user account name in File Explorer
Windows automatically creates a home folder for every user account with the same name as the user account name. So the easiest way to find the username of a Windows user account is to take a look at your home folder name in File Explorer. Here is how.
- Press “Win + E” to open File Explorer.
- Go to the “C:\Users\” folder.
- The Windows user account name is the same as your home folder name.
- With that, you now know your Windows user account name.
To find the username, open the File Explorer and go to the “C:\Users” folder. The Windows user account name is the same as your home folder name. In my case, the home folder name is ‘WindowsLoop.’ So, my user account name is ‘WindowsLoop.’ If your computer has multiple user accounts, find the home folder related to you.

2. Command to know Windows username
Windows has a couple of commands that show your current user name. Here are the commands you can use to find your user account name in Windows 10.
- Open the Start menu.
- Search and open “Command Prompt.”
- Type ‘
whoami‘ and press Enter. - The Command Prompt will show the username along with the actual computer name.
- With that, you know the username of your user account.

As an alternative to the ‘whoami‘ command, you can use the ‘echo %username%‘ command too. Unlike the first command, this command will show the current user’s username only.

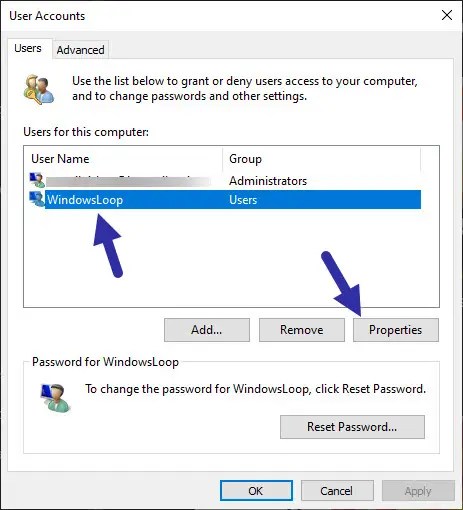
3. Find Windows user account name in netplwiz
You can use the netplwiz tool find your Windows username. Here is how.
- Press “Win + R” to open the Run window.
- Type “netplwiz” and press Enter.
- Select your user account.
- Click on the “Properties” button.
- You will find the Windows username in the “User name” field.
- Once you know the username, close the netplwiz window.


That is it. It is that simple to find user account name in Windows 10.
Also, apart from the username, do you know that you can get full user account details with a single command. Click on the link to learn how.
I hope that helps. If you are stuck or need some help, comment below and I will try to help as much as possible.