Windows Sandbox is a secure and isolated environment to run and test untrusted software and settings. Since the sandbox environment is completely isolated, any changes made to the system within the sandbox will not affect the host machine.
While Windows Sandbox is a valuable tool for any user, it is currently only available to those running the Pro or Enterprise edition of Windows. Unfortunately, this means that Home edition users cannot access this feature.
The good thing is, with a simple hack, you can enable Windows Sandbox in Windows 10 and Windows 11 Home edition. In this article, let me walk you through the step-by-step process of enabling Windows Sandbox in Windows Home edition.
Table of contents:
- How to enable Windows Sandbox in Windows 10 Home
- How to enable Windows Sandbox in Windows 11 Home
- How to disable Windows Sandbox in the Home edition
- What is Windows Sandbox
- What are the benefits of Windows Sandbox?
- Why is Windows Sandbox not available in the Home edition?
- Limitations of Windows Sandbox
- Conclusion
How to enable Windows Sandbox in Windows 10 Home
Since Windows Sandbox is not available directly in the Home edition, you have to run a special script that loads the required packages and makes it possible to enable Windows Sandbox in Windows 10 Home edition.
Here’s how to enable Windows Sandbox in Windows Home:
- Get the sandbox zip file.
- Extract the zip file to a folder.
- Open the extracted folder.
- Right-click on the “.bat” file in it.
- Choose the “Run as administrator” option.
- Type “Y” when prompted and press Enter.
- Reboot the computer.
- Click on the “Start icon” on the taskbar.
- Search and open “Turn Windows features on or off.”
- select the “Windows Sandbox” checkbox.
- Click on the “Ok” button.
- Click on the “Restart Now” button when prompted.
- With that, you’ve enabled Windows Sandbox in Windows 10 Home.
- You can open it from the Start menu.
Steps with more details:
First, we must create a new batch script file. This script enables and loads all the required modules to enable Windows Sandbox in Windows 10 Home. To do that, right-click on the desktop and select the “New -> Text document” option.

Note: If you don’t want to create the batch script manually, you can download it from here.
Now, we need to change the default name. Rename the file to “sandbox-installer.bat.” If you see a confirmation prompt, click “Yes.” It is important that you replace the .txt extension with .bat.

After renaming, right-click on the newly created file and select “Edit.” This action lets you edit the contents of the file.

As soon as you select the Edit option, the file opens in Notepad. Once opened, paste the below code into the file and click “File → Save” to save it. You can also press “Ctrl + S.”
@echo off

echo Checking for permissions
>nul 2>&1 "%SYSTEMROOT%\system32\cacls.exe" "%SYSTEMROOT%\system32\config\system"

echo Permission check result: %errorlevel%

REM --> If error flag set, we do not have admin.
if '%errorlevel%' NEQ '0' (
echo Requesting administrative privileges...
goto UACPrompt
) else ( goto gotAdmin )

:UACPrompt
echo Set UAC = CreateObject^("Shell.Application"^) > "%temp%\getadmin.vbs"
echo UAC.ShellExecute "%~s0", "", "", "runas", 1 >> "%temp%\getadmin.vbs"

echo Running created temporary "%temp%\getadmin.vbs"
timeout /T 2
"%temp%\getadmin.vbs"
exit /B

:gotAdmin
if exist "%temp%\getadmin.vbs" ( del "%temp%\getadmin.vbs" )
pushd "%CD%"
CD /D "%~dp0"

echo Batch was successfully started with admin privileges
echo .
cls
Title Sandbox Installer

pushd "%~dp0"

dir /b %SystemRoot%\servicing\Packages\*Containers*.mum >sandbox.txt

for /f %%i in ('findstr /i . sandbox.txt 2^>nul') do dism /online /norestart /add-package:"%SystemRoot%\servicing\Packages\%%i"

del sandbox.txt

Dism /online /enable-feature /featurename:Containers-DisposableClientVM /LimitAccess /ALL

pause

After saving and closing the batch file (.bat), right-click on it and select the “Run as administrator” option.

A Command Prompt window will open and load all the required packages as soon as you run the file. Once that is done, it will ask you to reboot Windows. Type Y and press Enter to reboot Windows.
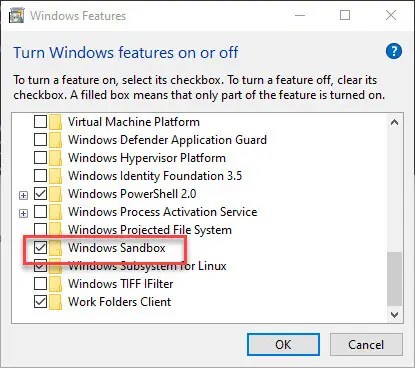
After reboot, click on the “Start icon” on the taskbar, search for “Turn Windows features on or off” in the start menu and click on the result to open “Windows Features.”
Scroll down in the Windows Features window, select the “Windows Sandbox” checkbox, and click “Ok” to continue.
The above action will trigger Windows to download any additional files required to enable Windows sandbox. Once that is done, you will be prompted to restart windows. Click on the “Restart Now” button.
After the second reboot, you can search “Windows Sandbox” in the start menu and click on the result to open and use Windows Sandbox in Windows 10 Home Edition.
How to enable Windows Sandbox in Windows 11 Home
Windows 11 Home edition users can enable Windows Sandbox using a simple batch file, just like with Windows 10.
Here’s how to enable Windows Sandbox in Windows 11 Home:
- Get the sandbox zip file.
- Extract the zip file to a folder and open it.
- Right-click on the “.bat” file in it.
- Select the “Run as administrator” option.
- Type “Y” to reboot the computer.
- Click on the “Start icon” on the taskbar.
- Search and open “Turn Windows features on or off.”
- Check the “Windows Sandbox” checkbox.
- Press the “Ok” button.
- Press “Restart Now” when prompted.
- With that, Windows Sandbox is enabled in Windows 11 Home.
- You can open it from the Start menu.
Steps with more details:
First, either download the pre-made Windows Sandbox batch file or create one yourself. To create it, right-click on the desktop and choose the “New -> Text document” option.
After creating the text document, open it, paste the below script into it, and press the “Ctrl + S” keyboard shortcut to save the file. You can also select the “File -> Save” option.
@echo off

echo Checking for permissions
>nul 2>&1 "%SYSTEMROOT%\system32\cacls.exe" "%SYSTEMROOT%\system32\config\system"

echo Permission check result: %errorlevel%

REM --> If error flag set, we do not have admin.
if '%errorlevel%' NEQ '0' (
echo Requesting administrative privileges...
goto UACPrompt
) else ( goto gotAdmin )

:UACPrompt
echo Set UAC = CreateObject^("Shell.Application"^) > "%temp%\getadmin.vbs"
echo UAC.ShellExecute "%~s0", "", "", "runas", 1 >> "%temp%\getadmin.vbs"

echo Running created temporary "%temp%\getadmin.vbs"
timeout /T 2
"%temp%\getadmin.vbs"
exit /B

:gotAdmin
if exist "%temp%\getadmin.vbs" ( del "%temp%\getadmin.vbs" )
pushd "%CD%"
CD /D "%~dp0"

echo Batch was successfully started with admin privileges
echo .
cls
Title Sandbox Installer

pushd "%~dp0"

dir /b %SystemRoot%\servicing\Packages\*Containers*.mum >sandbox.txt

for /f %%i in ('findstr /i . sandbox.txt 2^>nul') do dism /online /norestart /add-package:"%SystemRoot%\servicing\Packages\%%i"

del sandbox.txt

Dism /online /enable-feature /featurename:Containers-DisposableClientVM /LimitAccess /ALL

pause
Once the file is saved, close the window. Next, rename the file to “sandbox-installer.bat.” If you see a confirmation prompt, click “Yes.” This action will convert the text file to a batch file. It is important that you replace the .txt extension with .bat.
Now, right-click on the batch file and select the “Run as administrator” option. This action will run the batch file as an administrator.
When prompted, type “Y” in the command window and press “Enter” to reboot the computer.
Once the system is restarted, press the “Start key” on your keyboard, search for “Turn Windows features on or off” in the Start menu, and open it.
Next, scroll down the “Windows Features” window, check the “Windows Sandbox,” and press the “Ok” button.
Windows will now download and load the required components and prompt you to restart the computer. Click the “Restart Now” button.
That’s it; you’ve enabled Windows Sandbox in Windows 11 Home. You can search and open it from the Start menu.
How to disable Windows Sandbox in the Home edition
If you no longer need Windows Sandbox or enabling it is causing problems, you can disable Windows Sandbox. For that, you can either uncheck the “Windows Sandbox” option in “Turn Windows features on or off” or execute a DISM command. Here I’m showing the DISM method.
Here’s how to disable Windows Sandbox in the Home edition:
- Press “Start” on your taskbar.
- Search for “Command Prompt.”
- Click on “Run as administrator” in the Start menu.
- Run the following command.
Dism /online /Disable-Feature /FeatureName:"Containers-DisposableClientVM" - Close the command window after executing the command window.
- Reboot the Windows system.
- With that, you’ve removed Windows Sandbox in Windows 10/11 Home edition.
Steps with more details:
First of all, you need to open Command Prompt with admin rights. For that, search for “Command Prompt” in the Start menu and click on the “Run as administrator” option. Windows 11 users can also open “Terminal” with admin rights and then open the Command Prompt tab in it.
After opening the terminal window, execute the below command.
Dism /online /Disable-Feature /FeatureName:"Containers-DisposableClientVM"
As soon as you run the command, it will disable and remove Windows Sandbox from Windows 10 and 11. Though not required, it is better to restart the system to ensure all the changes are applied properly.
What is Windows Sandbox
Windows Sandbox is a built-in feature that allows you to run software in a safe and isolated environment. Anything you do in the Windows Sandbox does not affect the host operating system.
Think of it like a sandbox in a playground – just like how children play in a sandbox without worrying about the outside world; Windows Sandbox lets you run software without worrying about it affecting your main computer.
One of the best things about Windows Sandbox is that it is a stripped-down version of your Windows operating system. That means it is fully functional yet lightweight and easy to set up.
If you want more technical information about Windows Sandbox, its architecture, and more, I highly recommend you follow this link — https://learn.microsoft.com/en-us/windows/security/threat-protection/windows-sandbox/windows-sandbox-overview.
What are the benefits of Windows Sandbox?
Windows Sandbox allows you to run software in a safe and isolated environment. It provides an additional layer of security by isolating potentially dangerous software from the host system, reducing the risk of malware or other malicious software causing harm to your computer.
For instance, if you’ve come across an application that you’re unsure of its reputation and are hesitant to install it on your main system, you can use Windows Sandbox to test it. Instead of running the application directly on your computer, you can copy it to the Sandbox environment and run it there. The Sandbox environment is completely isolated, meaning that any changes made by the application will not affect your main system. Once you’re done testing the application, simply close the Sandbox window, and all the changes will be discarded.
Additionally, compared to full-fledged VMs that you can create with virtualization software like VMware or VirtualBox, Windows Sandbox requires no additional configuration or maintenance. That makes it an ideal solution for users who want a quick and easy way to test untrusted software without the need for a dedicated virtual machine.
Why is Windows Sandbox not available in the Home edition?
The main reason why Windows Sandbox is not available in Windows 10 or 11 Home edition is the artificial limit placed by Microsoft.
Unlike the old days, almost all modern CPUs have hardware-virtualization capability, and there is no reason to block Hyper-V or Windows Sandbox features in the Home edition.
Unfortunately, Hyper-V is one of the most sought-after features, and Microsoft knows it. So, they placed an artificial limit and made it available to Pro, Enterprise, and Education editions which generally cost more than the Home edition. Since Windows Sandbox is dependent on Hyper-V, it is not available by association.
Thankfully, it is not a hard limit. That means you can follow the above steps to easily enable Windows Sandbox in Windows 10 or 11 Home edition.
Limitations of Windows Sandbox
While Windows Sandbox offers a convenient and easy-to-use solution for running software in an isolated environment, it has some limitations compared to traditional virtual machines created using software like VMware or VirtualBox.
One limitation is the lack of a configuration panel, which makes it difficult to perform simple tasks like setting up shared folders, accessing the terminal, and more. Additionally, Windows Sandbox cannot save the state, meaning that each time the sandbox window is closed, the entire environment is reset, making it hard to set up the initial environment the way you want.
Other limitations include limited networking capabilities, lack of GPU support, no clipboard sharing between host and guest, and no access to devices plugged into the host.
These limitations may make Windows Sandbox less suitable for specific use cases that require more advanced features and customization.
Enabling Windows Sandbox in Home Edition — Conclusion
As you can see, though Windows Sandbox is not available to Home edition users out of the box, with a simple hack, you can enable it. Once enabled, you can open it from the Start menu and test the software and settings as you want.
One thing to keep in mind is that this is a simple hack, and there is no guarantee that it will work all the time or in all future versions of Windows.
I hope this simple and easy Windows how-to guide helped you.
If you are stuck or need help, send an email, and I will try to help as much as possible.
is this process safe ?
That is the whole idea of an OS Sandbox—-safety. Anything you do with the Sandbox gets erased when you close it. Installing it this way is perfectly safe but only works if you do not have another Virtual Machine installed at the same time. Try it. If you don’t like it, then remove it from the list and re-install a Virtual Box ,like Oracle, or Virtual Machine.
Hi, thanks for this tutorial. I just went through all the steps, then I clicked on the Windows Sandbox App and I’ve received the message “Windows Sandbox failed to initialise”. I don’t have any other Virtual Machine installed. Is there a way to reverse all of it (delete all the packages)? Cheers!
Uncheck the Windows Sandbox checkbox (see step 8).
Geez, you’re quick! Thanks, I’ve done that. But I was thinking of reversing the unpacking and installing of all the downloaded files, that are now obsolete. Or won’t they affect my system in any way?
Once you uncheck the option, Windows will automatically disable/uninstall packages as required. Being system packages, even if a package is active, it will not affect the system.
how long dose this take
Is it legal?