Recently, I’ve published a simple how-to guide on how you can use mobile data on Windows 10 via hotspot or USB tethering. One of the main concerns while using mobile data is consuming all the daily or monthly limit on the data plan. To avoid that, you can enable the metered connection setting. Follow the below steps to do so.
When you enable the metered connection setting, Windows will not download any sort of updates and even restricts background data activity. Additionally, you can also set data limits. For example, a cumulative Windows 10 update will be anywhere from 300MB to 500MB. When you look at it from the mobile data perspective, it is a very expensive download.
Apart from blocking Windows & store updates, Windows also keeps its own internet activity to a minimum as to not consume a lot of data.
Without further ado, let me show you how to enable the metered connection on a network in Windows 10.
Steps to Enable Metered Connection
Windows lets you enable the metered connection on a per-network basis. This is pretty helpful. For example, you might want to enable metered connection only on mobile data and not on the regular broadband connection.
1. First, connect to the network for which you want to enable the metered connection setting. In my case, I’ve created a Wi-Fi hotspot on my mobile and connected to it.
2. Next, click on the network icon on the taskbar to open the networks flyout menu. Here, click on the connected network and then click on the “Properties” link.
3. The above action will open the target connection’s network properties. Toggle the switch under “Set as Metered Connection” to “On” position.
4. If you want to, you can also set data limits on the connection. To do that, click on the “Set a data limit to help control data usage on this network”.
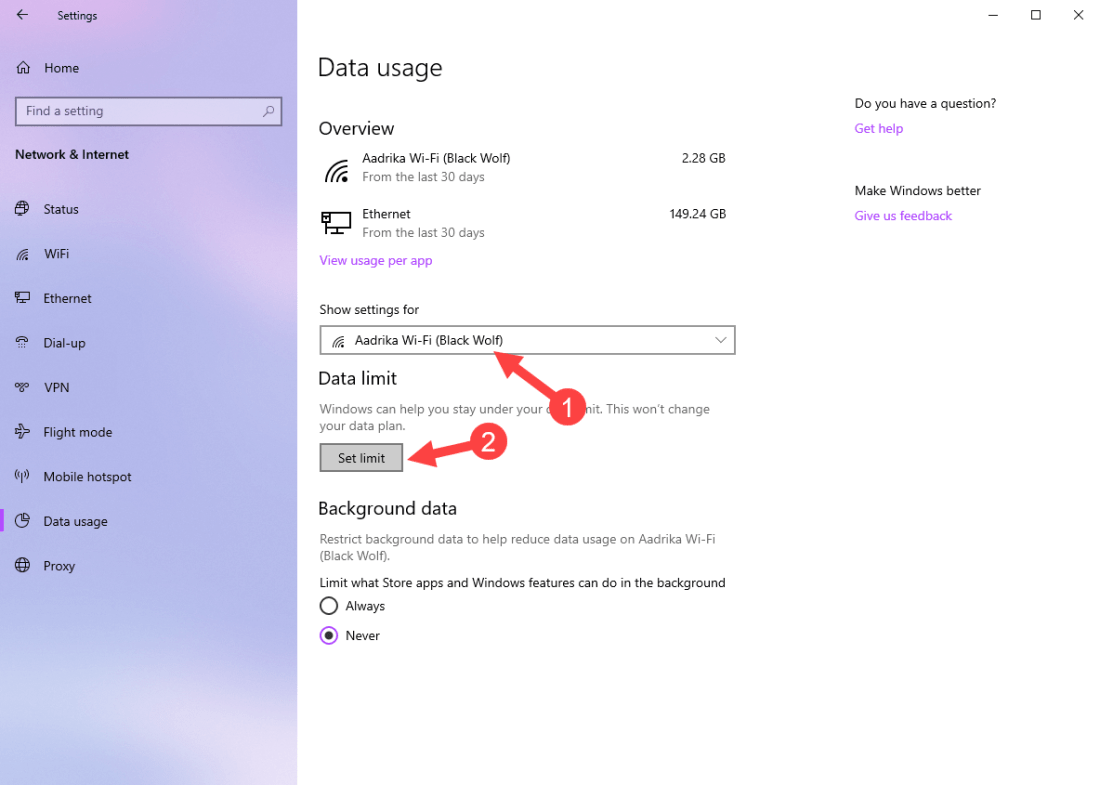
5. You will be taken to the Data Usage page. Here, select the network from the drop-down menu and click on the “Set limit” button.
6. In the next screen, set the limit according to your mobile data plan. In my case, I get 45GB data per month on my mobile plan. So, I set the data limit to match that. Click on the “Save” button to confirm the changes.
7. As soon as you set the limit, you will see the total consumed and remaining data on the network.
8. Finally, select the “Always” radio option under “Background data” section. This helps reduce data consumption by background apps, updates, and OneDrive sync activities.
Wrapping Up
That is all. It is that simple to enable metered connection in Windows 10. Keep in mind that depending on the application you are using, the data limit or metered connection will not help you reduce the data consumption. So, while using mobile data, be vigilant and don’t perform any data-heavy activities like HD streaming and online games.
If you are stuck or need some help, comment below and I will try to help as much as possible.
If you like this article, do check out how to create network connections desktop shortcut to easily access network adapters page in the control panel.


