SMB2 and/or SMB3 protocols are enabled by default in Windows. If ever needed, here are the steps to disable SMB2 and SMB3 in Windows.
Recently, Microsoft has to issue an emergency patch to wormable vulnerability in the SMB3 protocol. Essentially, this vulnerability lets the attacker execute malicious code on the target machine and take control of it. Being a wormable vulnerability, it can spread to other systems on the local network. If you haven’t yet installed the KB4551762 update, I recommend you do so as soon as possible to avoid any unnecessary issues.
If you haven’t installed the update yet, you can try disabling SMB3 in Windows 10 as a precaution. Here’s how.
Things You Should Know Before Hand
As a general rule, you should not disable SMB2 or SMB3 protocols. However, if you are unable to install the security patch or to troubleshoot various issues, you can temporarily disable SMB3 or SMB2 protocol.
SMB3 protocol serves an important function in several different features in Windows 10, 8, and 7. For example, if you disable SMB3 in Windows 10, you might face problems with the following Windows functionality.
- Folder and file properties caching
- Durable handles
- message signing
- scalable file sharing
- Symbolic links
- Large MTU support
- Transparent failover
- Encryption
- SMB direct
- and more…
Simply put, only follow the below steps and disable SMB3 protocol if you know what you are doing and is absolutely necessary. If you are interested, here’s a great document from Microsoft on the overview of SMB3.
Steps to Disable SMB3 or SMB2 Protocol
Note: SMB2 and SMB3 are linked together. So, enabling or disabling SMB2 will do that same for SMB3.
To disable SMB 3, you can either use the PowerShell or Command Prompt. I will show both methods. Follow the one you are comfortable with.
via PowerShell (Recommended)
1. Open PowerShell as admin. You can do that by searching for “PowerShell” in the start menu and selecting the “Run as administrator” option from the right-click menu.
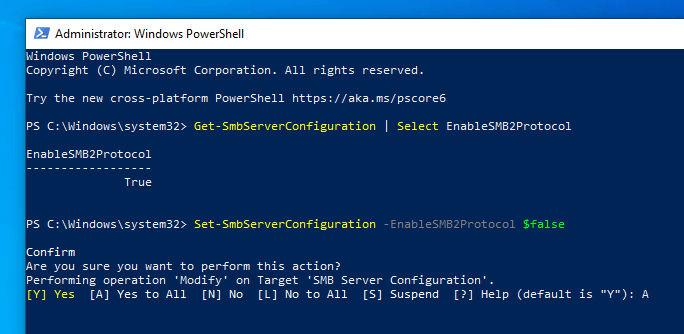
2. Next, verify that SMB3 is enabled by executing the below command. If the protocol is enabled, you should see “true” in the response.
Get-SmbServerConfiguration | Select EnableSMB2Protocol

3. To disable SMB3, execute this command.
Set-SmbServerConfiguration -EnableSMB2Protocol $false
4. PowerShell will ask for your confirmation, type “Y” or “A” and press Enter to confirm.
5. Once disabled, you can verify it by executing the first command. If the protocol is disabled, you should see “false“.

6. Finally, reboot Windows to apply the changes.
To re-enable SMB3, you can use the below command.
Set-SmbServerConfiguration -EnableSMB2Protocol $true
via Command Prompt
As an alternative, you can also use the Command Prompt to disable SMB3. The only problem is that it is not that intuitive as the PowerShell method. But, it works nonetheless.
1. Search for “cmd” in the start menu, right-click on “Command Prompt” result and select “Run as administrator“.
2. In the command prompt window, execute the below commands one of the other.
sc.exe config lanmanworkstation depend= bowser/mrxsmb10/nsi
next
sc.exe config mrxsmb20 start= disabled
3. Once that is done, reboot Windows to apply changes. After rebooting, the SMB3 protocol will be disabled.
To enable the SMB3 protocol again, open Command Prompt as admin execute the below commands one after the other.
sc.exe config lanmanworkstation depend= bowser/mrxsmb10/mrxsmb20/nsi
next
sc.exe config mrxsmb20 start= auto
Wrapping Up
As you can see, it is pretty easy to disable SMB3 and SMB2 protocols in Windows 10. Like said before, don’t disable the SMB3 protocol permanently. Do this for troubleshooting purposes and only if you know what you are doing and understand the consequences.
I hope that helps. If you are stuck or need some help, comment below and I will try to help as much as possible.