If you want to migrate from VirtualBox to VMware, you can convert VirtualBox image to VMware so that you don’t have to start from scratch in VMware.
When it comes to virtualization, VirtualBox is one of the best. Not only VirtualBox is free but it is feature-rich and highly configurable with a lot of support from the industry. That being said, one of the shortfalls for VirtualBox is that when compared to VMware, the performance of virtual machines is not that good, at least for me.
So, if you are looking for a relatively high performing virtual machine and don’t mind the limitations of the VMware free version, you can move from VirtualBox to VMware.
Without further ado, let me show how you can convert VirtualBox to VMware in Windows.
Steps to Convert VirtualBox to VMware
Just like when you try to convert VMware to VirtualBox, you first need to convert the virtual machine to the OVA format. However, compared to VMware, VirtualBox has proper options to quickly convert. There is no need to meddle with Command Prompt or PowerShell. Follow the steps and you should be good.
1. First, make sure the virtual machine you are trying to convert is shut down and completely powered off. That is, it should not be in saved or paused state. If it is, you cannot convert the virtual machine.
2. Once you’ve confirmed that your virtual machine is completely turned off, select the virtual machine of the left panel. Now, select the “File → Export Appliance” option.
3. The above action will open the export wizard. Here, select the virtual machine, set a destination to save the converted OVA file and click on the Next button.
4. Depending on the virtual machine size, it can take some time to complete the conversion process.
5. Once the conversion is completed, you will see the OVA file at the destination.
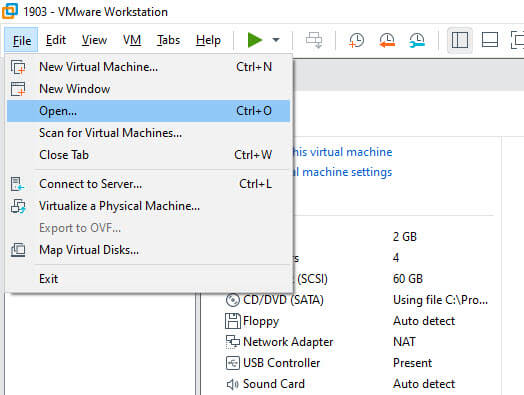
6. Now we need to import the virtual machine into VMware. To do that, open VMware and select the “File → Open” option.
7. Now, navigate to where the OVA file is located, select it and click on the “Open” button.
That is it. VMware should import the virtual machine from VirtualBox. Under certain circumstances, the import might fail. In those situations, click the “Retry” button a couple of times and the VM should be imported.
That being, consider how VMware and VirtualBox implement the OVF/OVA feature and how heavily you’ve configured your virtual machine, it can sometimes be impossible to import the VM. If that’s the case, there is nothing much you can do. I recommend you fresh install the operating system in VMware.
Hope that helps. If you are stuck or need some help, comment below and I will try to help as much as possible.