BitLocker is the default encryption program on Windows, providing an extra layer of security to your sensitive data. This article shows you how to check if BitLocker is enabled and it’s status.
On modern Windows versions, like Windows 10 and 11, BitLocker is enabled by default. That way, even if your device is lost or stolen, the encrypted data will not be accessible without the BitLocker key.
If you recently changed the BitLocker status or don’t know if your drives are protected with BitLocker, you can check if BitLocker is enabled or not quite easily. For example, if you are storing important files on an external hard disk, then it is vital to check if BitLocker is enabled on that drive. That way, you can be sure that your files are protected with strong BitLocker encryption.
So, without ado, let me show you how to check if BitLocker is enabled on your computer and drives.
Table of contents:
Check if BitLocker Is Enabled via Settings
You can use the Settings app to verify the BitLocker status and find if BitLocker is enabled. Follow the below steps.
- Use Windows key + I to open the Settings app.
- Select Privacy & Security on the sidebar.
- Click on Device Encryption on the main page.
- If Device Encryption is turned on, BitLocker is enabled.
- Close the Settings app.
First of all, open the Settings app. Either use the Start key + I keyboard shortcut or click ‘Start > Settings.’ Go to the Privacy & Security > Device Encryption page in the Settings app. On this page, if the Device Encryption option is turned on, BitLocker is enabled. If Device Encryption is turned off, BitLocker is disabled.

To enable BitLocker on your Windows computer, turn on the Device Encryption option.
Command To Check if BitLocker Is Enabled
Windows also has a simple command to check if BitLocker is enabled. Using this command, you can verify if BitLocker is turned on a specific drive. For example, you can check if your external hard drive or another partition on your computer has BitLocker enabled.
Follow these steps to find out if BitLocker is enabled on a drive:
First, open Command Prompt or PowerShell. You can also open Windows Terminal. Right-click the Start icon on the taskbar and select Terminal (Admin).
PowerShell:
The Windows Terminal, by default, opens with the PowerShell tab. So, run the below command while replacing DriveLetter with the target drive letter.
Get-BitLockerVolume -MountPoint "DriveLetter:"
For example, if you want to check if your D drive has BitLocker is enabled, run the below command.
Get-BitLockerVolume -MountPoint "D:"

If BitLocker is enabled, you will see ‘FullyEncrypted’ in the Volume Status column. You can also see the BitLocker auto-unlock status under the Auto Unlock column.
Command Prompt:
If you want to use Command Prompt, click the down arrow icon on the Terminal’s down arrow icon and select Command Prompt. This action opens the Command Prompt tab in Windows Terminal.
Run the below command in the Command Prompt tab to check if BitLocker is enabled on a particular drive. Replace DriveLetter with the target drive letter.
manage-bde -status DriveLetter:
For example, if you want to check if your D drive has BitLocker is enabled, run the below command.
manage-bde -status D:
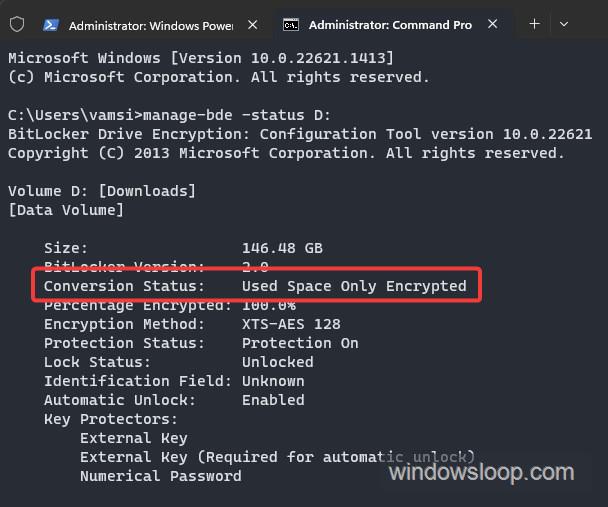
If BitLocker is enabled, you will see the ‘Fully Encrypted’ or ‘Used Space Only Encrypted’ message next to Conversion Status.
Note: Fully Encrypted means BitLocker is encrypting the entire drive, including the free and unused space. Used Space Only Encrypted means BitLocker is only encrypting used space on a drive. i.e., all the files and data on the drive, not the empty space.
—
That is it. It is that simple to check if BitLocker is enabled or not in Windows.
I hope this simple and easy Windows how-to guide is useful to you.
If you are stuck or need help, email me, and I will try to help as much as possible.