The default system font on Windows 10 & 11 is Segoe UI. That’s how it’s been since Windows 7. While Segoe UI is a pretty good font with good readability, seeing it day in and day out can be pretty boring, especially for those who like to customize Windows. So, if you get bored or looking for a deep personalization, you can change the system with an alternate font of your choice. It’s a pretty task and makes your system look new and fresh. In this tutorial, I will show you the steps you should follow to change the system font on Windows 11 & 10. Let’s get started.
Steps to Change the System Font on Windows 11/10
Windows doesn’t give you a native option to swap the system font with a new font of your choice. However, we can do it by modifying the Windows Registry to force the system to use the font of your choice for all user interface elements. Here’s how to do that.
Step 1: Find the Name of the Font You Want To Use
The first thing you should do is to find and note down the exact name of the font you want to use as the system font.
1. First, press Windows key + R to open the Run dialog box. Type C:\Windows\Fonts in the Run dialog box and click OK.

2. The above action opens the Windows Fonts folder. Here, find the font you want to use and note down its name.
Note: If you cannot see the font then it means that you did not install it. To install a new font, right-click on the font file and select Install for All Users option.

3. Next, open the Start menu, search for regedit, and click on the top result to open the Registry Editor.

4. In the Registry Editor, go to the following folder.
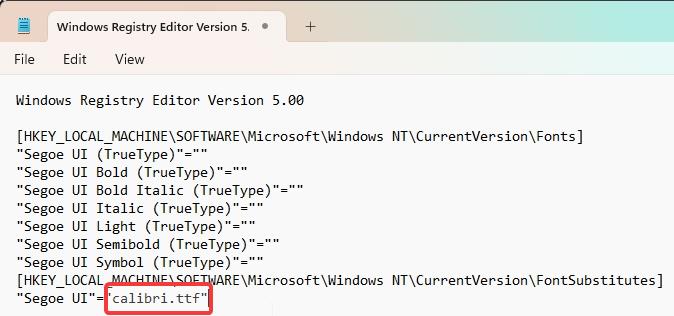
HKEY_LOCAL_MACHINE\SOFTWARE\Microsoft\Windows NT\CurrentVersion\Fonts
5. On the right panel, find the font you want to set as the system font and note down its exact value (including the extension) under the Data column. For example, I want to use Calibri as my new system font, as I note down ‘calibri.ttf’.

Step 2: Backup the Registry Keys To Be Safe
Once you have the actual font name (along with its extension), the next mandatory step is to back up the registry. Now, rather than creating a full backup, we’ll back up the exact keys so that you can restore them easily when you want to switch back to the default system font.
6. In the Registry Window, right-click on the Fonts folder in the left panel and select Export.

7. Go to a folder in the Export window, type a name of your choice in the File Name field, and click Save.

8. Next, right-click on the FontSubstitutes folder and select Export.

9. Go to a folder in the Export window, type a name of your choice in the File Name field, and click Save.

10. With that, you are done backing up the registry files. Close the Registry Editor window.
Step 3: Use the Registry File to Change the System Font
To change the default system font on Windows, we have to force Windows to reference the font of our choice instead of the Segoe UI. You can do that by modifying the registry. Here’s how.
11. Open the Start menu, search for Notepad, and click on the top result to open the Notepad program.

12. In the Notepad, copy and paste the below script in it while replacing ‘YourFontName’ with the font name (along with its extension) you noted down in Step 1. In my case, the font name is calibri.ttf.
Windows Registry Editor Version 5.00
[HKEY_LOCAL_MACHINE\SOFTWARE\Microsoft\Windows NT\CurrentVersion\Fonts]
"Segoe UI (TrueType)"=""
"Segoe UI Bold (TrueType)"=""
"Segoe UI Bold Italic (TrueType)"=""
"Segoe UI Italic (TrueType)"=""
"Segoe UI Light (TrueType)"=""
"Segoe UI Semibold (TrueType)"=""
"Segoe UI Symbol (TrueType)"=""
[HKEY_LOCAL_MACHINE\SOFTWARE\Microsoft\Windows NT\CurrentVersion\FontSubstitutes]
"Segoe UI"="YourFontName"
13. Click the File > Save As option.

14. Go to a folder of your choice, type ChangeFont.reg in the ‘File Name’ field, select All Files from the ‘Save as Type’ dropdown menu, and click Save.

15. Close the Notepad window.
16. Next, open the File Explorer, go to the folder where you saved the file, right-click on it, and select Open/Merge.

17. Click Yes in the confirmation window.

Step 4: Restart your PC
18. Finally, restart your PC to apply the changes. To restart, right-click on the start icon on the taskbar and select Shut down or Sign out > Restart.

Once your PC has been restarted, you will see that your system’s font has been changed to the font of your choice. In my case, that is Calibri font.
Inconsistencies After Changing the System Font
After changing the system font, some UI elements and applications might still use the default system font. Even when the font is changed, the font weight or style might be different.
This happens for a couple of reasons.
In the case of still using the default font, Segoe UI, it’s because the font is deeply integrated and some applications and UI elements are hard-coded to use that font. In that case, no matter what you do, those applications and UI elements will only use the default font.
In case of inconsistent font weight and style, it’s because UI elements might explicitly call for different font weights or styles that are not available in the font you selected to use. In those instances, Windows might use the font weight or style it thinks is the best.
For example, if a UI element calls for a semi-bold font-weight but it’s not available, Windows might use the regular bold font making the UI look a bit weird. To fix it, all you have to do is use a font with several different font weights.
Restore Windows To Use Default System Font ‘Segoe UI’
If you want to revert to using the default system then all you have to do is restore the font settings in the registry. Here’s how.
If you created the backup as I instructed in Step 2, right-click on each backed-up .reg file and select Open. When prompted if you want to merge, click Yes and then OK.
Note: Windows 10 users should select Merge.

Alternative Method:
If you did not create the backup or if you lost it, follow the below instructions:
1. Open Notepad by searching for it in the Start menu.
2. In the Notepad window, copy and paste the below script and click File > Save As.
Windows Registry Editor Version 5.00
[HKEY_LOCAL_MACHINE\SOFTWARE\Microsoft\Windows NT\CurrentVersion\Fonts]
"Segoe UI (TrueType)"="segoeui.ttf"
"Segoe UI Black (TrueType)"="seguibl.ttf"
"Segoe UI Black Italic (TrueType)"="seguibli.ttf"
"Segoe UI Bold (TrueType)"="segoeuib.ttf"
"Segoe UI Bold Italic (TrueType)"="segoeuiz.ttf"
"Segoe UI Emoji (TrueType)"="seguiemj.ttf"
"Segoe UI Historic (TrueType)"="seguihis.ttf"
"Segoe UI Italic (TrueType)"="segoeuii.ttf"
"Segoe UI Light (TrueType)"="segoeuil.ttf"
"Segoe UI Light Italic (TrueType)"="seguili.ttf"
"Segoe UI Semibold (TrueType)"="seguisb.ttf"
"Segoe UI Semibold Italic (TrueType)"="seguisbi.ttf"
"Segoe UI Semilight (TrueType)"="segoeuisl.ttf"
"Segoe UI Semilight Italic (TrueType)"="seguisli.ttf"
"Segoe UI Symbol (TrueType)"="seguisym.ttf"
"Segoe MDL2 Assets (TrueType)"="segmdl2.ttf"
"Segoe Print (TrueType)"="segoepr.ttf"
"Segoe Print Bold (TrueType)"="segoeprb.ttf"
"Segoe Script (TrueType)"="segoesc.ttf"
"Segoe Script Bold (TrueType)"="segoescb.ttf"
[HKEY_LOCAL_MACHINE\SOFTWARE\Microsoft\Windows NT\CurrentVersion\FontSubstitutes]
"Segoe UI"=-

3. Go to a folder where you want to save the file, type “RestoreDefaultSystemFont.reg” as the ‘File Name,’ select All Files from the ‘File Type’ dropdown menu, and click Save.

4. Close the Notepad window.
5. Next, open File Explorer (press Windows key + E), go to the folder where you just saved the .reg file, right-click on it, and select Open (or Merge).

6. Click the Yes and OK buttons when prompted.

7. Finally, restart your computer and Segoe UI, the default system font is restored.
Wrapping Up – System Font Customization in Windows
And there you have it! This is how you change the system font on Windows 11 or 10. As I note in the article, keep the inconsistencies your mind and use a suitable font. Also, don’t forget to backup the registry before changing the system font as the backup helps you restore the default settings when you want to revert or if something goes wrong while editing the registry values.
If you have any questions, comment below and I will answer and help you.