From the right-click menu, you can calculate different hashes like SHA256, SHA512, MD5, etc. Here’s how to add file hash to context menu.
In day to day life, we download a lot of files from the internet. When you download something, you need to make sure that it comes from a reputed source and not modified in any way whatsoever. One way to check file integrity is to calculate its hash value.
In case you don’t know, a hash value is an algorithmically generated value using the file contents rather than superficial things like file name and extension. Since the value is generated using the file contents, if the file is modified in any way, no matter how tiny the change is, the hash value will change automatically. There is no way around it. Simply put, a hash value gives you a cryptographically secure way to determine the file integrity. In addition to that, you can also use the hash values to differentiate between two identical files.
Generally, you have to manually execute commands to get different hash values. However, to makes things easier, you can add the Hash option to the right-click context menu. This allows you to find the hash value with just two clicks. Here’s how you can do it.
Add Hash Option to Right-click Context Menu
Windows uses PowerShell’s Get-FileHash cmdlet to give you the hash value. The cmdlet supports several different hash algorithms like MD5, MACTripleDES, SHA1, SHA256, SHA384, SHA512, etc. We can add all these algorithms as sub-options to the Hash option in the right-click menu. Though sounds complicated, it is very easy to do. Just follow the steps as is and it will be done in no time.
1. Since we need to create a lot of new values for different types of hash algorithms, to make things easier, I made the reg file for you. Download the file from here and extract the contents of the zip file to your desktop.

2. After extracting the files, double-click on the “AddHashOptionRightClick.reg” file. You will see a prompt asking if you like to merge the file with your Registry. Click on the “Yes” button to continue.

3. Once merged, you will see a prompt telling you the same. Click on the “Ok” button to close it.

That is it. You’ve added the Hash option to the context menu. Just right-click on any file and select “Hash” and then target hash algorithm.
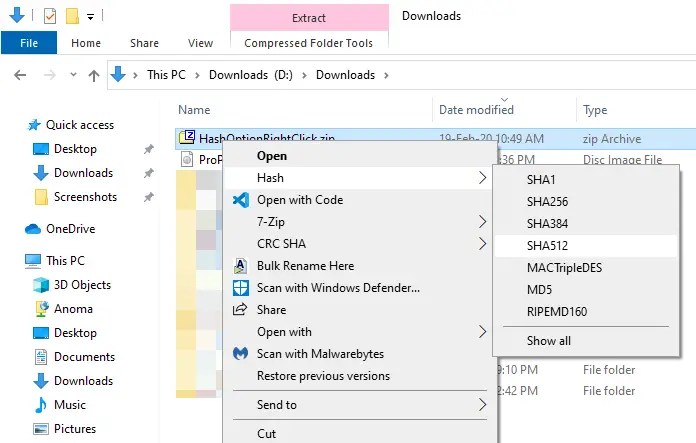
As soon as you select the option, a PowerShell window open with showing you the hash value. If you want to see hash value in all the different algorithms, select the “Show all” option.

Remove the Hash Option
If you no longer need the Hash option in the context menu, you can remove it. Just execute the “RemoveHashOptionRightClick.reg” file and follow the step 2 and step 3 from above. As soon as you do that, the Hash option will be removed.

I hope that helps. If you are stuck or need some help, comment below and I will try to help as much as possible. How to clean up the right-click context menu.